Add Subscription
A subscription sends the report results for an investigation to recipients via email as an attachment. Click the Subscriptions link to open the Subscription to window. You can specify recipients to receive this report as an email attachment in a specified format.
NOTE: This option requires an email server to be configured.If this requirement is not met, a message will appear in the window. See theEmail Page section for additional information.
Subscribe to an Investigation
Follow the steps to subscribe to an investigation.
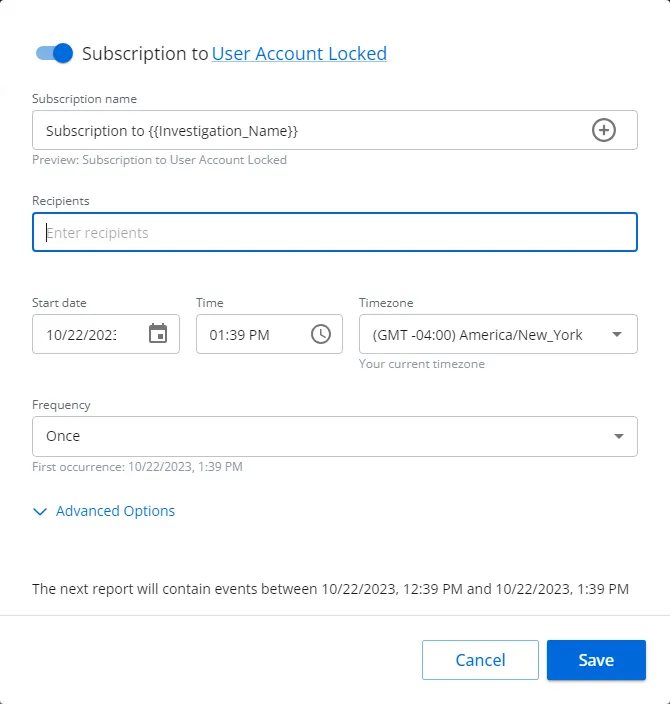
Step 1 – From the desired investigation, click Subscriptions. The Subscription window opens.
The name of the respective investigation is displayed as a link. Click it to view the filter defined for the investigation.
Step 2 – By default the subscription is enabled. You can disable it with the toggle button by the window name.
Step 3 – Modify the subscription name as desired in the Subscription name field. The default
name is: Subscription for {{Investigation_Name}}. This variable will be replaced with the name of
the investigation. The + button opens a variable menu for the field.
Step 4 – Enter the email addresses for the recipients of this report subscription in the Recipients box.
Step 5 – Set the start date, time, and timezone for the selected frequency:
- Start date – This field opens a calender. You can also type a date in the field.
- Time – This field opens a clock. You can also type a date in the field.
- Timezone – This field opens a drop-down menu. Select the desired timezone.
Step 6 – Set a frequency. Options in the Frequency drop-down menu are: Once, Daily, Weekly, and Monthly. Ensure the frequency does not exceed the "Time to Retain" settings for the System Jobs configured in the System Settings interface.
Step 7 – There are two additional settings in the Advanced Options section. Click the arrow to expand this section.
Step 8 – Modify the email subject line in the Email subject field as desired. The default name
is: Subscription to{{Investigation_Name}} at {{Date}}. These variables will be replaced with the
name of the investigation and the date of the report. The + button opens a variable menu for the
field.
Step 9 – Set the file name in the File name field. The default name
is: {{Investigation_Name}}_{{Date}}. This variable will be replaced with the name of the
investigation. The + button opens a variable menu for the field.
Step 10 – Select the file format for the export from the drop-down menu: CSV, PDF, JSON, Excel Viewing.
Step 11 – Click Save. The Subscription export window closes.
The subscription is listed on the Subscriptions and Exports page of the Investigations interface.
See the Subscriptions and Exports Page topic for additional information.
Subscriptions and Exports Page
A subscription sends the report results for an investigation to recipients via email as an attachment. An export puts the report results for an investigation into a desired format. The Subscriptions and Exports page provides a list of investigations that are either subscribed to or scheduled for export.
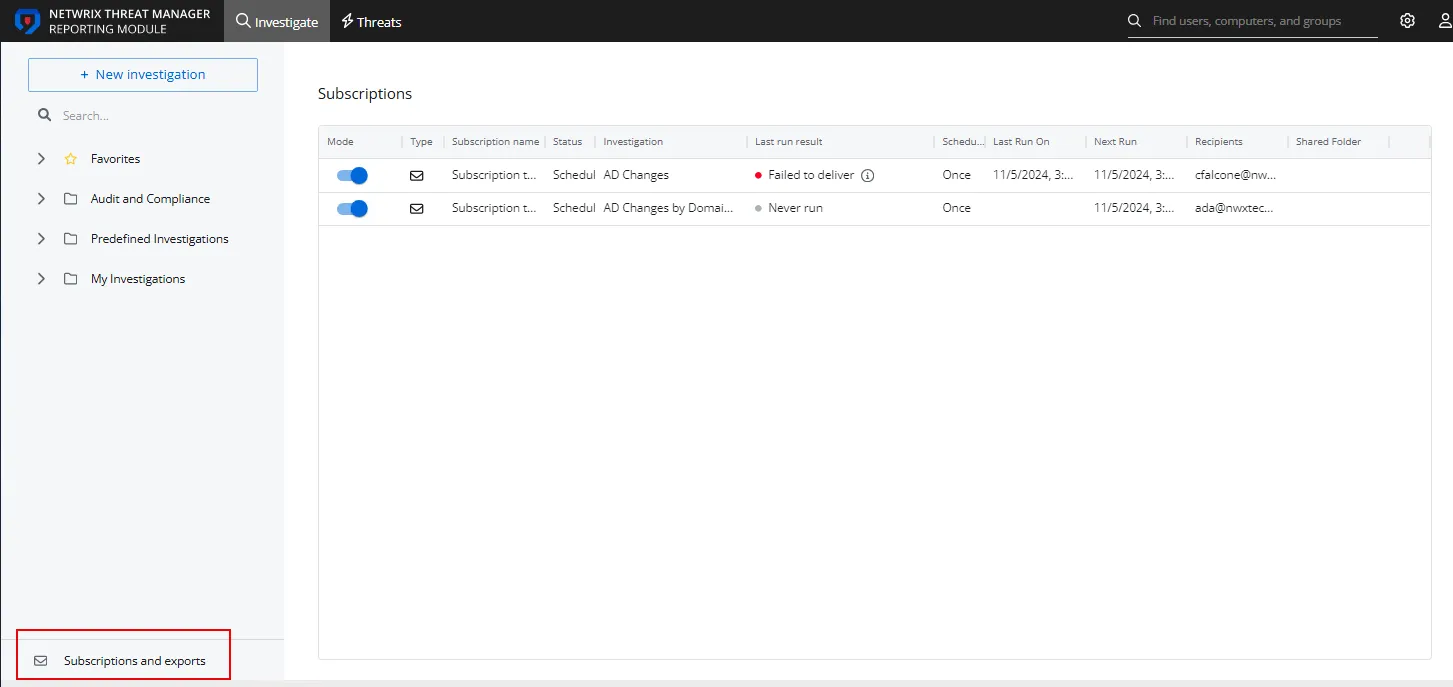
The table has the following columns:
- Mode – Toggle button enables and disables the scheduled report
- Type – Icon indicates the delivery method for the subscription: email or shared folder
- Subscription name – Subscription name of an investigation
- Status – Indicates the subscription status: Scheduled or Disabled
- Investigation – Displays the name of the investigation that is associated with the subscription.
- Last run result – Displays the status of the last scheduled report, which include Never run, Delivered, Failed to deliver, or Failed to complete
- Schedule – Displays the schedule frequency of the subscription or export
- Last Run on – Date timestamp of the last scheduled report
- Next Run – Date timestamp of the next scheduled report
- Recipients – List of email recipients subscribed to the report
- Shared folder – Display name for the configured shared folder where scheduled exports are stored
- Actions – Menu option per table row. This column does not have a header. It is represented by three dots and shows up when you hover over a row.
See the Add Subscription topic and Export Report topic for additional information.
Table Features
The table has several features accessed through the menu button that appears when you hover over a column header.

In addition to the arrow that appears to sort the table in ascending or descending order, the menu contains the following options:
- Unsort – Removes all sorting from the table
- Sort by ASC – Sorts the table in ascending order for the selected column
- Sort by DESC – Sorts the table in descending order for the selected column
- Filter – Opens the Table Filter window to build a filter statement for the table
- Hide – Hides the selected column from the table
- Show columns – Opens the Column window with a list of all available columns for the table and a toggle button to show or hide each column
- Pin to left – Moves the column to the far left of the table and pins it there
- Pin to right – Moves the column to the far right of the table and pins it there
- Unpin – Returns the column to its original location. This option appears if the column has been pinned.
Build a Table Filter Statement
The Table Filter window opens from the table column menu.

Follow the steps to build a filter statement.
Step 1 – Select a table column from the Columns drop-down menu.
Step 2 – Select an operator from the Operator drop-down menu. Options include: contains, equals, starts with, ends with, is empty, is not empty, and is any of.
Step 3 – Enter the text string for the filter value in the Value box.
Step 4 – To build a complex filter statement, click Add filter. A new row appears with an additional drop-down menu for creating an AND or an OR statement. Then repeat Steps 1-3 for the row.
The table is filtered to matches of the filter.
Actions Menu
The Actions column holds a menu with actions that apply to the selected subscription or export.

The options include:
- Duplicate – Opens the Subscription to or Schedule export window to configure another subscription or export for the associated investigation
- Edit –Opens the Subscription to or Schedule export window to modify the current subscription or export
- Run Now – Runs the subscription or export report immediately
- Turn off – Disables the subscription or export
- Turn on – Enables the subscription or export
- Delete – Deletes the scheduled subscription or export