Netwrix Integrations Page
The Netwrix Integrations page within the Integrations interface lists the products for which the application is configured to connect.
Use the gear icon in the upper right corner of the console to open the Configuration menu. Then select Integrations to open the Integrations interface.
Click Netwrix Integrations in the navigation pane to view a list of the Netwrix products already integrated with the Netwrix Threat Manager Reporting Module, if any.
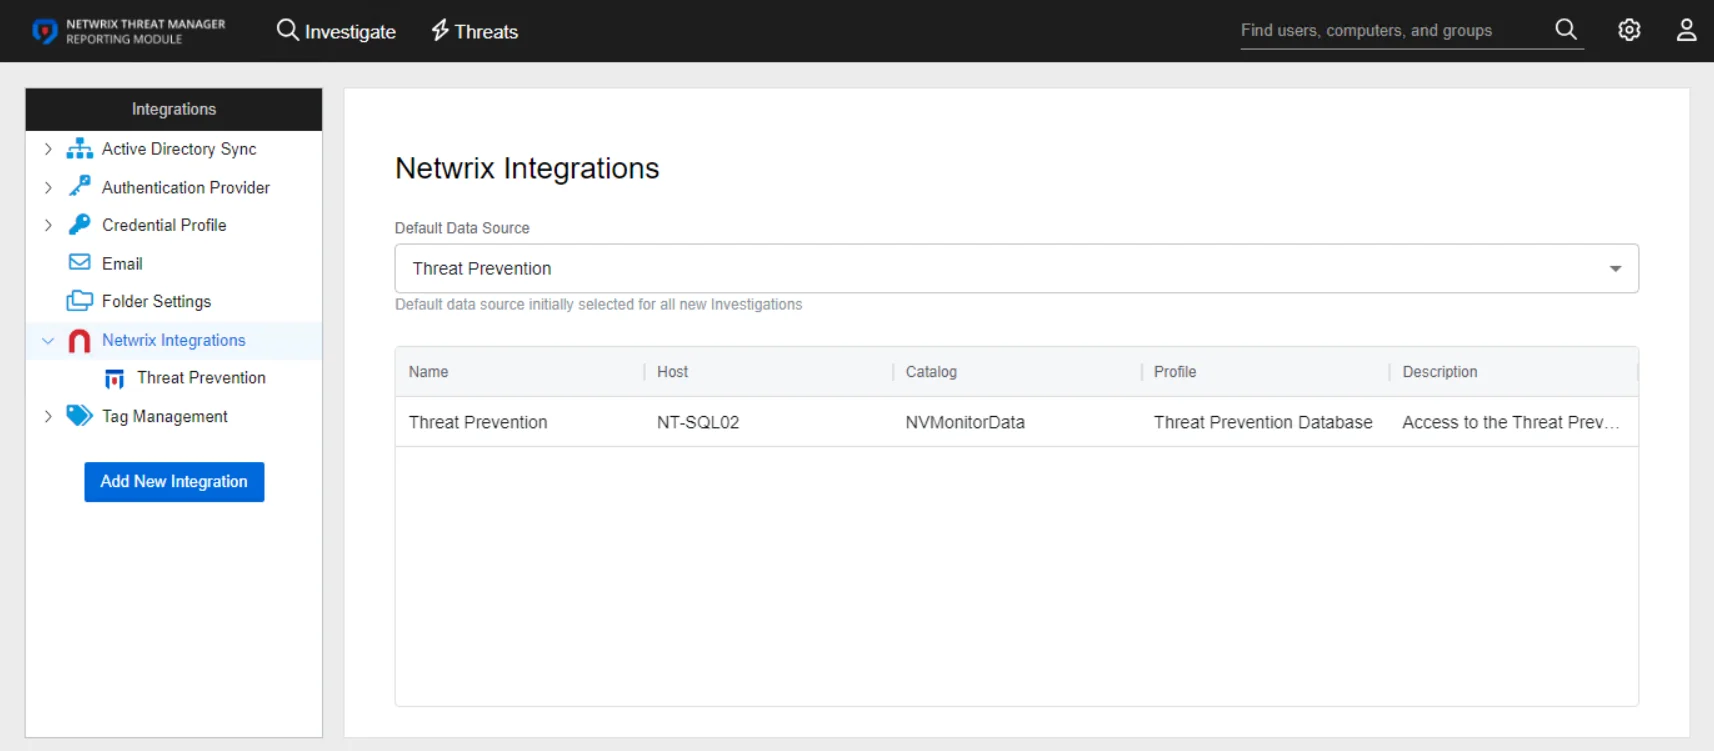
Integrations with other Netwrix products enables you to run Investigations on the event data within the connected database. When you add a Netwrixintegration, the selection for Default Data Source identifies which database is the default source for Investigation reports. You can change it by selecting a different database from the drop-down menu. The table provides the following information:
- Name – The name of the integration, as supplied when it was added
- Host – The name of the database host
- Catalog – The name of the database
- Profile – The Name of the Credential Profile assigned to the integration
- Description – Integration description, as supplied when it was added
To view integration details or make modifications, select an integration from the list or under Netwrix Integrations in the navigation pane.
Add a Netwrix Integration
Prior to adding a Netwrix Integration, you must first configure a Credential Profile with credentials properly provisioned for connecting to the database. See the Reporting Module Server Requirements topic for the permissions. See the Credential Profile Page topic for additional information on creating a profile.
Follow the steps to add a Netwrix product for integration.
Step 1 – Use the gear icon in the upper right corner of the console to open the Configuration menu. Then select Integrations to open the Integrations interface.
Step 2 – On the Integrations interface, click Add New Integration in the navigation pane. The Add New Integration window opens.
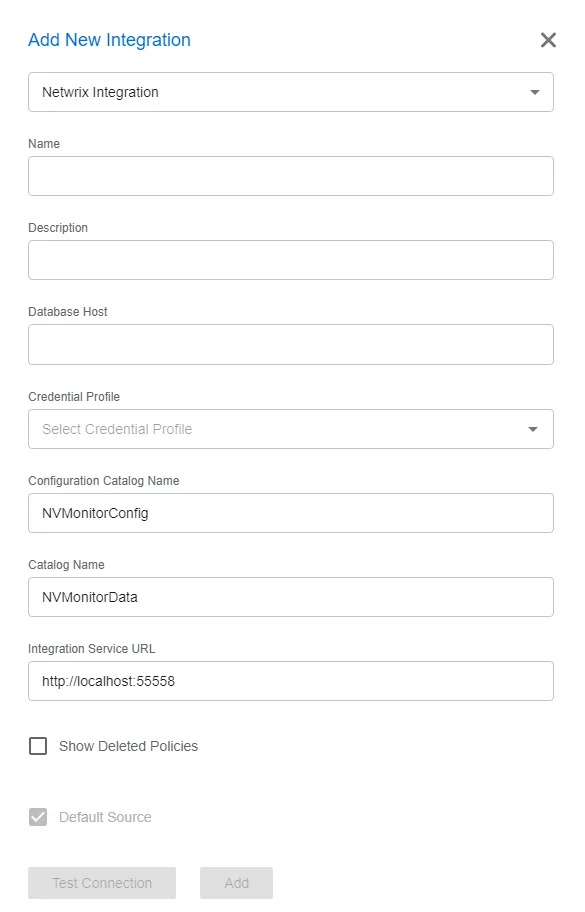
Step 3 – In the Type drop-down list, select Netwrix Integration.
Step 4 – Enter the following information:
-
Name – Provide a unique, descriptive name of the integration
-
Description – Provide an Integration description
-
Database Host – Enter the database server hostname (NetBIOS name, FQDN, or IP address) with the instance name or non-standard port, if applicable, in one of the following formats:
- No named instance, use
[SQLHostName], for exampleNT-SQL02 - Named instance, use
[SQLHostName]\[SQLInstanceName], for exampleNT-SQL02\Netwrix - No named instance with non-standard port, use
[SQLHostName],[PortNumber], for exampleNT-SQL02,72 - Named instance with non-standard port, use
[SQLHostName]\[SQLInstanceName],[PortNumber], for exampleNT-SQL02\Netwrix,72
- No named instance, use
-
Credential Profile – Select the Credential Profile by name from the drop-down menu. This was pre-created in the Credential Profiles page.
-
Configuration Catalog Name – Enter the name of the configuration database. By default, this is set to the name of the Threat Prevention database,
NVMonitorConfig. -
Catalog Name – Enter the name of the database. By default, this is set to the name of the Threat Prevention database,
NVMonitorData. -
Integration Service URL – This should not be modified. It is the URL for the service endpoint, by default
http://localhost:55558. -
Show Deleted Policies – When this option is checked, deleted policies will show on the Policy Sync tab of this Netwrix integration.
-
Default Source – When checked, the database is the default source for Investigation reports. This option cannot be deselected for the first integration configured.
Step 5 – Click Test Connection to ensure connection to the database. This will take a moment. Then a message will appear in the upper right corner of the console indicating a successful or failed connection. If successful, move on to the next step. If failed, recheck your entries for error and repeat this step until a successful connection is established.
Step 6 – Click Add. The Add New Integration window closes.
The Netwrix Integration is listed in the Integrations navigation pane.
For integration with Netwrix Threat Prevention, you can add both the main NVMonitorData
database and the archive database, if one has been configured.
Netwrix Integration Details
Follow the steps to view the details of a Netwrix product integration.
Step 7 – Use the gear icon in the upper right corner of the console to open the Configuration menu. Then select Integrations to open the Integrations interface.
Step 8 – On the Integrations interface, click Netwrix Integrations in the navigation pane to view a list of the already integrated Netwrix products.
Step 9 – Select a product from the table or the navigation pane to view the integration details.
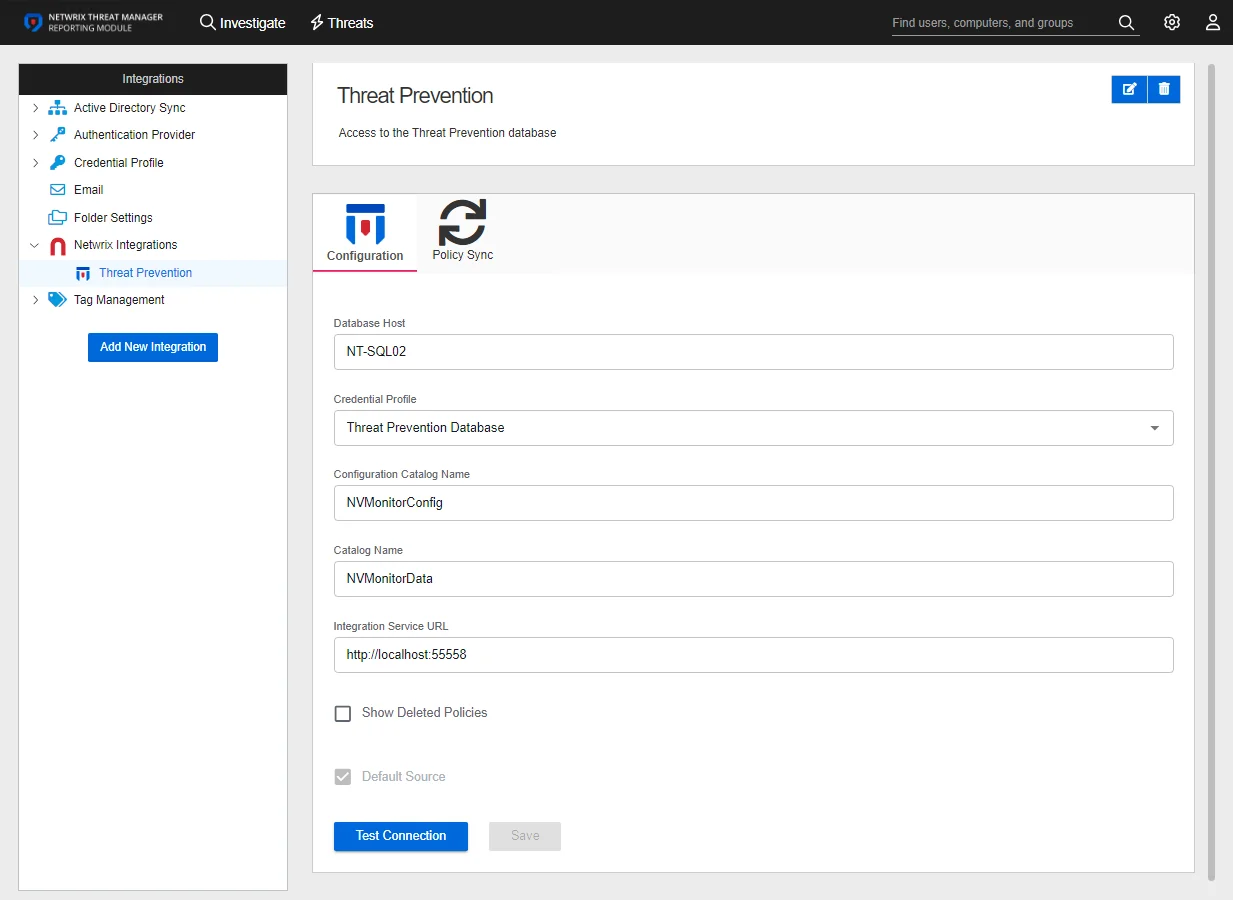
The following information is displayed:
-
Name and Description – The box at the top displays the name and description of the integration
- Edit – The edit button in the upper right corner of the box changes those fields from read-only to editable. See the Edit Integration Name and Description topic for additional information.
- Delete – The delete button in the upper right corner of the box opens the Delete Stealthbits Integration window to confirm the action
-
Configuration – Displays the settings entered for the selected integration. To modify the settings, see the Configuration Tab topic.
-
Policy Sync – Displays information on the last policy sync executed. See the Policy Sync Tab topic for additional information.
Configuration Tab
The Configuration tab displays the settings entered for the selected integration.
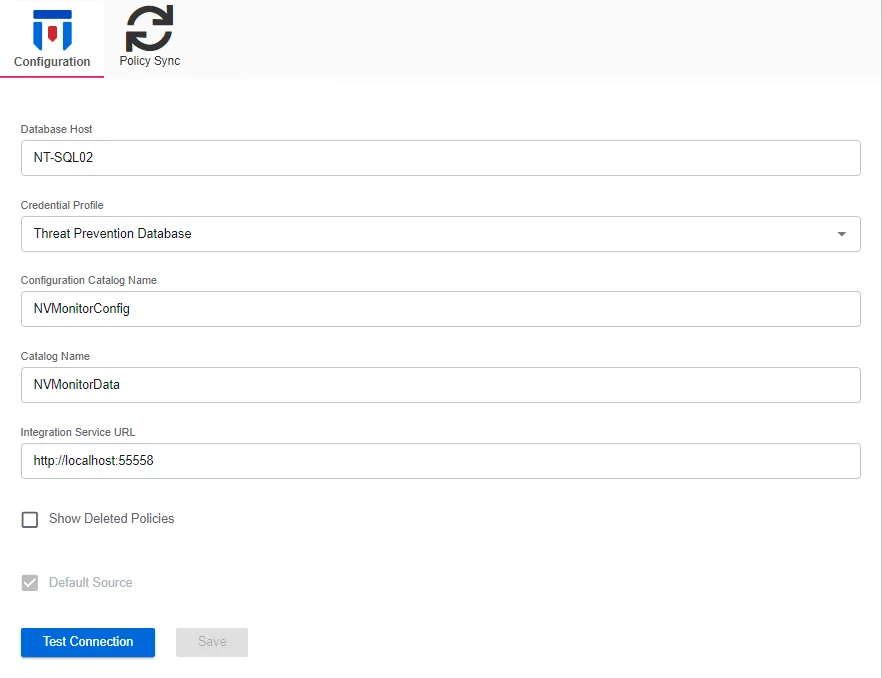
The tab provides the following settings:
- Database Host – Displays the name of the database host in the supplied format
- Credential Profile – Displays the Credential Profile by name
- Configuration Catalog Name – Displays the name of the configuration database
- Catalog Name – Displays the name of the database
- Integration Service URL – Displays the URL for the service endpoint. This should not be modified.
- Show Deleted Policies – When this option is checked, deleted policies will show on the Policy Sync tab of this Netwrix integration.
- Default Source – Indicates whether the database is the default source for Investigation reports
- Test Connection – Click Test Connection to ensure connection to the database. This will take a moment. Then a message will appear in the upper right corner of the console indicating a successful or failed connection.
The Save button is enabled when any settings are modified. Click it to commit the changes before leaving the page.
Policy Sync Tab
The Policy Sync tab displays information on the last policy sync executed.
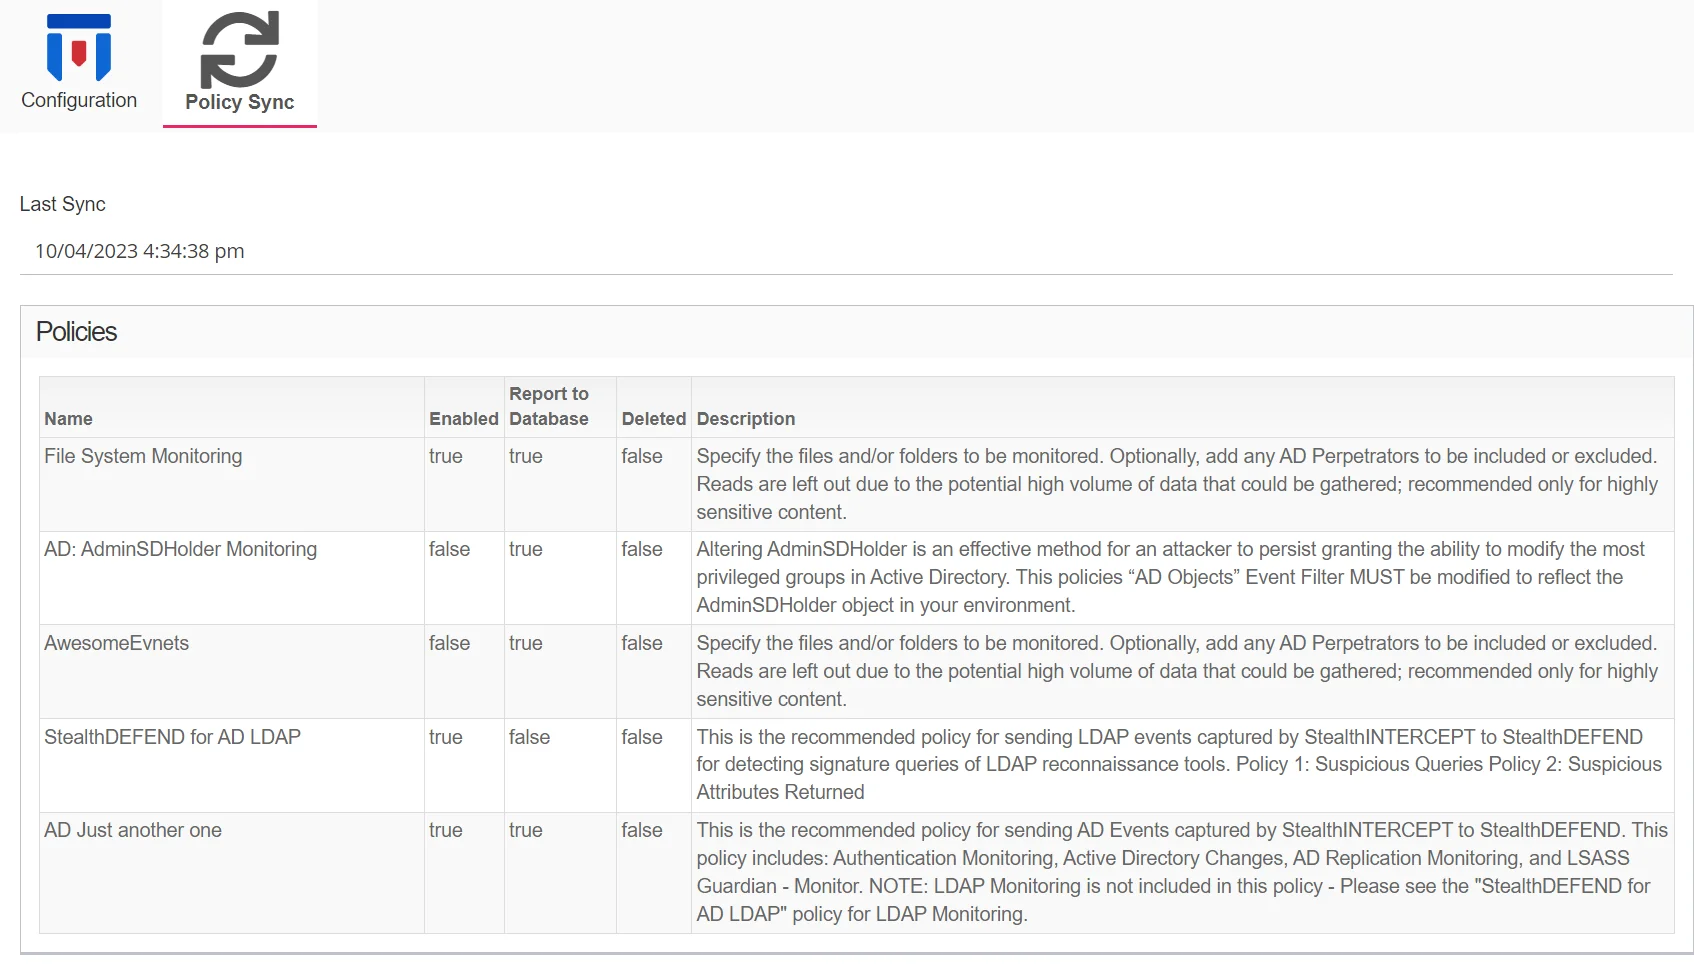
The tab provides the following information:
-
Last Sync – Displays the date timestamp of the last sync
-
Policies – The table displays the following information:
- Name – The name of the Threat Prevention policy
- Enabled – Indicates if the policy is enabled (true) or disabled (false)
- Report to Database – Indicates if the policy is sending events to the Threat Prevention SQL database
- Deleted – Indicates if the policy is deleted (true) or not deleted (false)
- Description – The description of the policy as read from Threat Prevention
Edit Integration Name and Description
Follow the steps to edit a Netwrix Integration name and/or description.
Step 1 – Use the gear icon in the upper right corner of the console to open the Configuration menu. Then select Integrations to open the Integrations interface.
Step 2 – On the Integrations interface, click Netwrix Integrations and select the desired Netwrix Integration.
Step 3 – Click the Edit button in the upper right corner of the name and description box.

Step 4 – Type in the top field to modify the integration name.
Step 5 – Type in the bottom field to modify the integration description.
Step 6 – Click the Save button.
The Netwrix Integration name and/or description have been modified.
Modify Netwrix Integration Configuration
Follow the steps to modify the configuration for the selected integration.
Step 1 – On the Integrations interface, click Netwrix Integrations and select the desired Netwrix Integration.
Step 2 – The Configuration tab opens, where you can make the desired modification.
Step 3 – To modify the Database Host, modify the value by typing in the textbox.
Step 4 – To modify the Credential Profile, select the Credential Profile by name from the drop-down menu. This was pre-created in the Credential Profiles page.
If you modify the Credential Profile for a domain, click Test Connection to ensure connection to the database. This will take a moment. Then a message will appear in the upper right corner of the console indicating a successful or failed connection.
Step 5 – For the Configuration Catalog Name, modify the value by typing in the textbox.
Step 6 – For the Catalog Name, modify the value by typing in the textbox.
Remember, the Integration Service URL value should not be modified.
Step 7 – Check or uncheck the Show Deleted Policies box as desired.
Step 8 – The Save button is enabled when any settings are modified. Click it to commit the changes before leaving the page.
The changes to the Configuration have been committed.