Deploy Agents
The Threat Prevention Agent can be deployed through any of the following methods:
-
Deploy the Agent to server(s) through the Administration Console – You can deploy the Agent to one or multiple servers through the Administration Console
infoThis is the recommended method for deploying the Agent.
-
Manually through the Windows Agent Setup Wizard – Run the Agent executable to launch this wizard
See the Manual Agent Deployment topic for additional information.
Deploy Agents Wizard
The Deploy Agents wizard enables you to deploy Agents from the Administration Console. Computers targeted for Agent deployment must meet the minimum .NET Framework version required by the Agent or the deployment fails. Remember to check server requirements before deploying the Agent, including compatibility with other security products. See the Agent Server Requirements topic for additional information.
The wizard does not block access to the Administration Console and can be minimized while actions are in progress. If this wizard is hidden by clicking outside of the dialog box, a flashing blue link displays on the upper right corner of the interface with the action name displayed. Click this link to bring back the focus to the wizard.
The Deploy Agents wizard consists of four windows: Select Computers, Set Options, Prerequisites Check, and Installing.
Follow the steps to deploy the Agent from the Administration Console to a new or existing machine using the Deploy Agents wizard.
Closing the Administration Console while this action is in process causes problems with data collection.
Step 1 – Click Agents in the left pane to launch the Agents interface.
Step 2 – On the Agents interface, click the Deploy Agent (+) button on the top right corner. To re-install a previously uninstalled Agent, select the Install Agent right-click menu option for that machine in the grid. The Select Computers window opens.

Step 3 – On the Select Computers window, add the host or IP addresses of the target machines to the Deploy Agents to These Computers box. Use any of the three methods, as represented by the three tabs on the window. See the Select Computers Window topic for additional information. Click Next.
If you open this window through the Right-Click Menu action, the list is auto-populated with the computer(s) selected on the Agents interface.
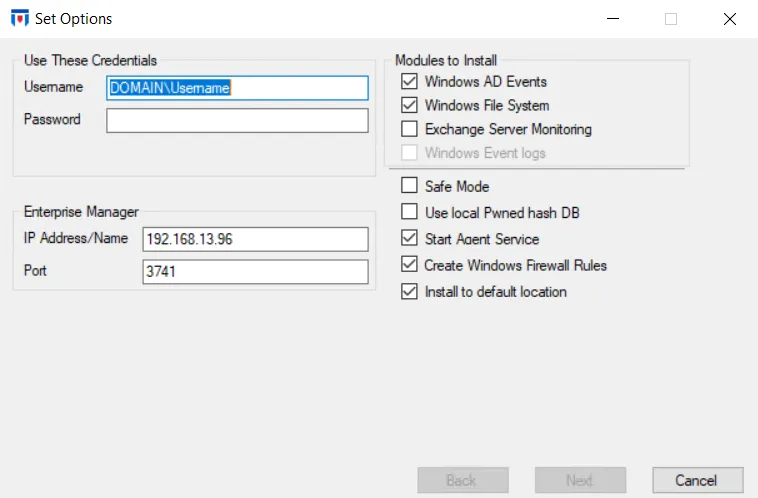
Step 4 – On the Set Options window, enter the credentials required to deploy the Agent on the selected machine(s). Review the Enterprise Manager IP address/name and port for accuracy and select the desired modules to install for this Agent. You can also set other properties for the Agent. See the Set Options Window topic for additional information.
Step 5 – Once configurations are set, click Next.
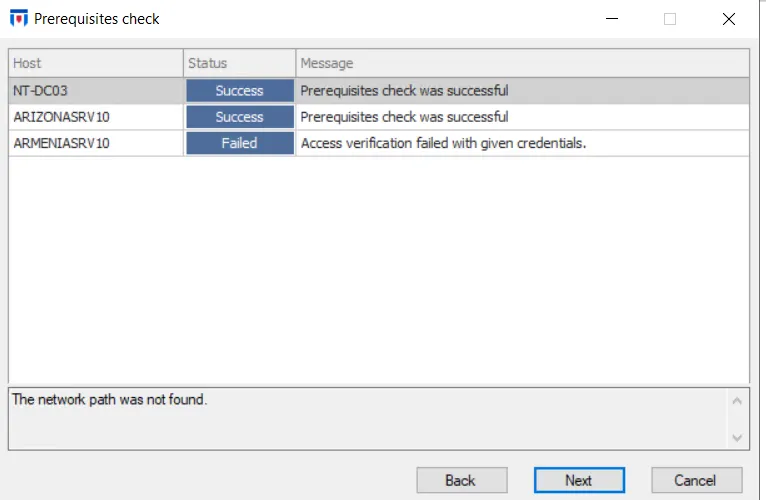
Step 6 – On the Prerequisites Check window, the credentials provided on the Set Options window either succeed or fail during a prerequisites or verification check. It also initiates a prerequisite check for the Agent. See the Prerequisites Check Window topic for additional information.

Step 7 – The Installing window performs the installation and displays whether or not the action was successful. See the Installing Window topic for additional information.
Step 8 – When the task is successfully completed, click Finish to close the window.
The Agent will be listed in the table on the Agents interface.
If the server where the Agent is deployed has multiple network adapters (multi-homed), then it is necessary to bind the Agent to an adapter that can communicate with the Enterprise Manager. See the Bind To topic for additional information.
Update Agent Settings
Follow the steps to update the settings for a deployed Agent through the Agents interface.
Step 1 – Click Agents in the left pane to launch the Agents interface.
Step 2 – On the Agents interface, right-click the Agent and select Update Agent Settings on the Right-Click Menu. The Select Computers window opens.
Step 3 – On the Select Computers window, the computer where the Agent is deployed is automatically added to the Update Agent settings on These Computers box. See the Select Computers Window topic for additional information. Click Next.
Step 4 – On the Set Options window, ensure the proper credentials, modules, and Enterprise Manager location are accurate alongside additional options. To make changes to the settings, uncheck the Keep Existing Settings box. Make necessary updates as needed. See the Set Options Window topic for additional information.
Step 5 – On the Prerequisites Check window, the credentials provided on the Set Options window either succeed or fail during a prerequisites or verification check. See the Prerequisites Check Window topic for additional information. Click Next.
Step 6 – On the Updating Settings window, the Agent will be stopped and restarted. One of two status messages display:
- Failed – Read the failure message and either click Back to provide new credentials or click Finish to close the window and ensure any error messages are taken care of prior to next attempt
- Completed – Indicates that the Agent has been successfully updated
Step 7 – Click Finish to close the window.
The status of the Agent update will display in the grid on the Agents interface.