Alerts Cleanup Window
You can clear alert data displayed on the Alerts Interface as well as schedule cleanups for this data.
RECOMMENDED: Export alert data before using the Clear option. See the Alerts Export Window topic for additional information.
Follow the steps to clear the alerts data.
Step 1 – Click Alerts in the left pane to launch the Alerts interface.
Step 2 – On the Alerts interface, click the Clear icon in the top right corner.
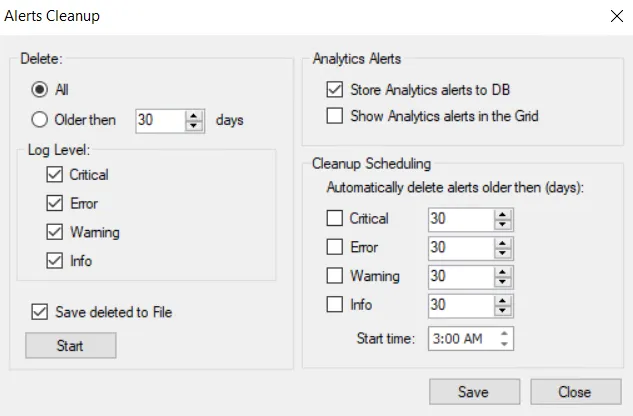
Step 3 – The Alerts Cleanup window has these options:
- Delete – Removes alert data from the database. Select All to delete all alert data or select Older than and specify a certain number of days to delete alerts older than the specified number of days.
- Log Level – Deletes alerts that have the log levels that are checked. The log levels are equivalent to the alert severity levels in the data grid on the Alerts Interface.
- Save deleted to File – Saves alert data to a CSV file before it is deleted from the database. On clicking Start, the Save As window appears. Specify a file name and location; the default name is “AlertsBackup[date]_[timestamp]”. Then click Save.
- Analytics Alerts – Choose to display Threat Prevention analytics alerts in the database and/or show them in the Alerts interface. If you choose to display them on the Alerts interface, then this data will also be deleted in the cleanup function.
- Cleanup Scheduling – Deletes alerts after a specific number of days if the severity level is selected from the list. Set the start time for when the cleanup begins.
Step 4 – Click Start to run the alerts cleanup with the applied settings.
Step 5 – Click Save to save any changes or Close to discard the changes and close the window.
Threat Prevention clears alert data from the database according to these configurations. It generates a new alert to notify that the alert data is cleared, identifies the user who cleared the alerts, displays a date time stamp, and what options were configured for the cleanup operation.