RADIUS Authentication Provider
The Remote Authentication Dial-In User Service (RADIUS) is a networking protocol that provides centralized authentication, authorization, and accounting management for users connecting to a network service.
Once you have added an authentication provider, as discussed in the Add an Authentication Provider topic, the next step is to configure the provider for use with a supported authentication provider type, i.e., OpenID, RADIUS, or SAML.
Use the gear icon in the upper right corner of the console to open the Configuration menu. Then select Integrations to open the Integrations interface.
On the Integrations interface, select an authentication provider under the Authentication Provider node in the navigation pane or from the table to configure, view, or modify its details.
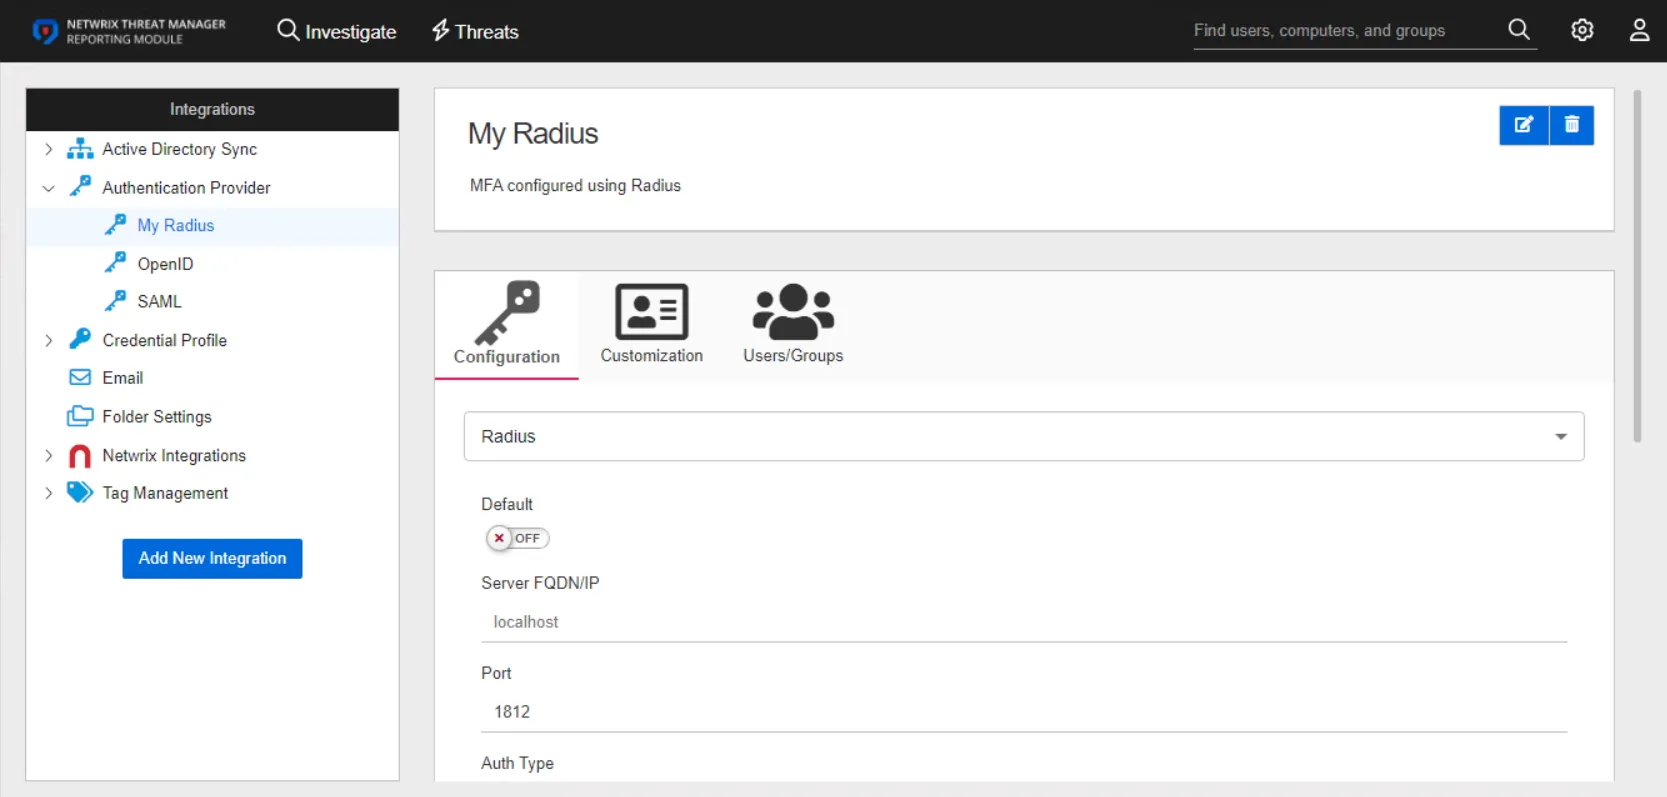
The details page for a RADIUS authentication provider has three tabs:
- Configuration
- Customization
- Users/Groups
Configuration Tab
Configure the following settings for a RADIUS provider on the Configuration tab:

-
Default – The default profile applied when a user is assigned multiple authentication profiles. When off, the profile will be determined in alphabetical order of the profile name. Toggle off and on as desired.
-
Server FQDN/IP – The address of the RADIUS proxy
-
Port – The port for the RADIUS proxy
-
Auth Type – The security protocol used by the RADIUS proxy. Use the drop-down menu to select either MSCHAPv2 or PAP.
-
Shared Secret – A secret shared between the application server and the RADIUS proxy
-
User Name Format Type – Active Directory attribute or attributes that will be sent to the RADIUS authentication provider to identify the user. Some common identification attributes are available in the drop-down list. If necessary, a custom option is also provided. This option instructs the application to send a custom value to the RADIUS provider based on the user's Active Directory attribute, supplied in the Custom Name Format field.
-
Custom Name Format – This field appears when the Custom User Name Format Type is selected. It has a unique syntax as follows:
-
Active Directory Attribute:
{attributename}- Example –
{firstname}_{lastname}
- Example –
-
First Character(s) of an Active Directory Attribute:
{3:AttributeName}– Where "3" is the number of characters to select- Example –
{1:firstname}_{lastname}
- Example –
-
Last Character(s) of an Active Directory Attribute:
{AttributeName:3}– Where "3" is the number of characters to select- Example –
{firstname}_{telephoneNumber:4}
- Example –
-
Text values can be hard coded to send a static text value for each user:
- Example –
MyCompany_{lastname}
- Example –
-
-
Max Retries – The maximum number of times to attempt reconnecting to the RADIUS proxy if unable to connect
-
Timeouts (in seconds) – The default timeout value for RADIUS connection and authentication requests. The default value is 60 seconds.
Click Save to commit the configuration settings.
Customization Tab
The Customization tab is unique to RADIUS authentication providers. It contains the following settings that need to be configured:

- Title for MFA Authentication dialog – The title that is displayed to the user when prompted for MFA
- Text for MFA Authentication dialog – The text description that is displayed to the user when prompted for MFA
- Send Initial Text – If On, the value in the Initial Auto Response Text is automatically sent to the RADIUS proxy without user action. Toggle On or Off as desired.
- Initial Auto Response Text – This value is sent to the RADIUS server automatically if the Send Initial Text option is enabled. For example, this might be “push” to immediately have the user’s phone app prompt for authorization.
- Prefix for Response Text – This value is added to the start of the responses. The value will vary according to server.
- Send NAS Identifier – When On, NAS identifiers are transmitted to the RADIUS proxy. This is needed for certain RADIUS proxy implementations that require it. Toggle On or Off as desired.
Click Save to save the configuration settings.
Users/Groups Tab
The Users/Groups tab displays users and groups that are currently assigned to this authentication profile. To give access to the application to new users, click the New Access button, which opens the Add Console Access window. To assign this authentication provider to existing users, go to System Settings > User Access Page.
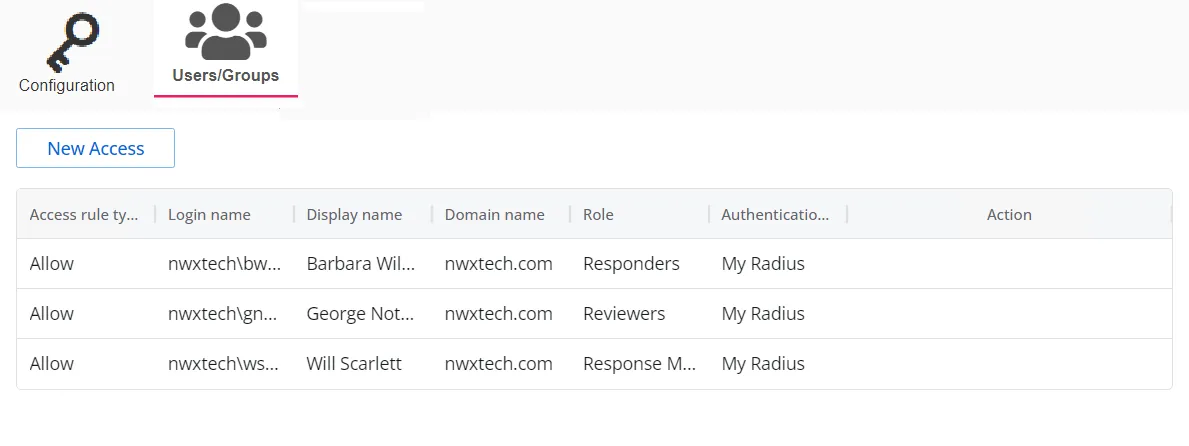
The table displays the following information:
-
Access rule type – Indicates the access type as Allow, which enables console access, or Deny, which disables console access
-
Login name – The NTStyle domain name for the user or group account
-
Display name – The display name for the user or group account
-
Domain name – Name of the domain. This may be either the domain DNS name or domain controller hostname.
-
Role – The role assigned to the user or group for accessing this application
-
Authentication Type – Type of MFA authentication assigned to the user or group
-
Action – This column has the following icons for conducting actions on the user or group:
- Edit icon – Allows you to edit the columns in the selected row by enabling drop-down menus. The edit icon changes to a save icon while in edit mode.
- Trash icon – Opens a Warning window to confirm the action of deleting the user or group. Removing a user or group removes console access for it.
- Reset MFA button – Forces the user or every user in the group to reconfigure MFA on the next login. This option is only available if an MFA authentication type is applied to the user or group.
See the User Access Page topic for additional information.