Archive Data
To use the Move operation on the Database Maintenance Window, you must specify a database where Threat Prevention archives data. You can also define settings to delete data aged beyond a specified threshold from the archive database.
Consider periodically retiring the current archive database and creating a new one. Depending on the size of the archive database, it could be yearly or every few years.
Configure the Archive Database
To configure settings for the archive database:
Step 1 – Click Configuration > Database > Maintenance on the menu. The Database Maintenance window opens. Click the Archive DB tab.
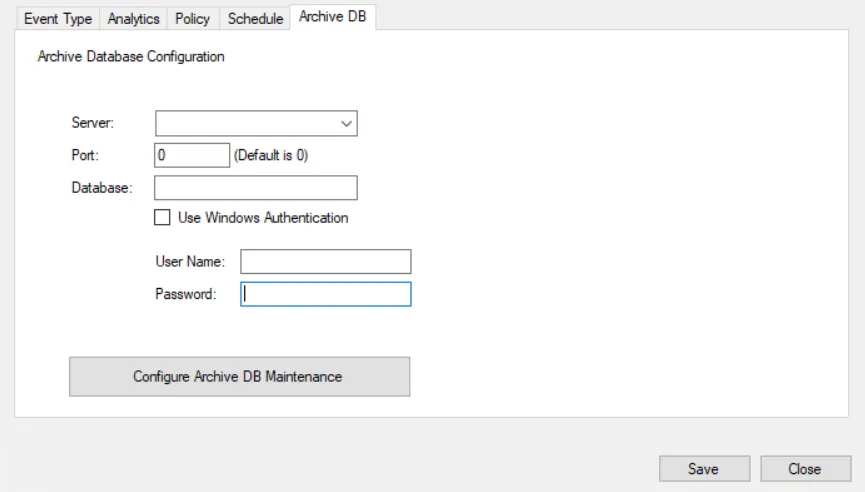
Step 2 – Enter the following information for the database where Threat Prevention archives data:
- Server – SQL Server where the archive database is located
- Port – Instance port number, by default this is set to 0
- Database – Name of the archive database
- Authentication
- For Windows Authentication – Check the Use Windows Authentication box
- For SQL Authentication – Enter theuser name and password of an account to use for SQL authentication
Step 3 – Click Save to save the configurations.
To query archived event data, use the Investigate interface. See the Investigate Interface topic for additional information.
Enable Database Maintenance for the Archive Database
You can specify settings to automatically delete archived data that has aged beyond a specified threshold. You can set the threshold per Event Type, per Analytics, and/or per Policy. Although you can enable all three options with different retention periods, the Event Type maintenance settings take precedence over Policy maintenance settings where the selected policy employs that event type.
The Alerts Interface displays alerts generated for the archive database maintenance job with "Archive DB:" as a prefix in the Message column. This helps you distinguish between alerts generated for database maintenance and archive database maintenance.
To enable database maintenance for the archive database:
Step 1 – Click Configuration > Database > Maintenance on the menu. The Database Maintenance window opens. Click the Archive DB tab.
Ensure that you have configured the archive database settings and that the archiving process has run at least once.
Step 2 – Click the Configure Archive DB Maintenance button. The Archive DB Maintenance window opens.
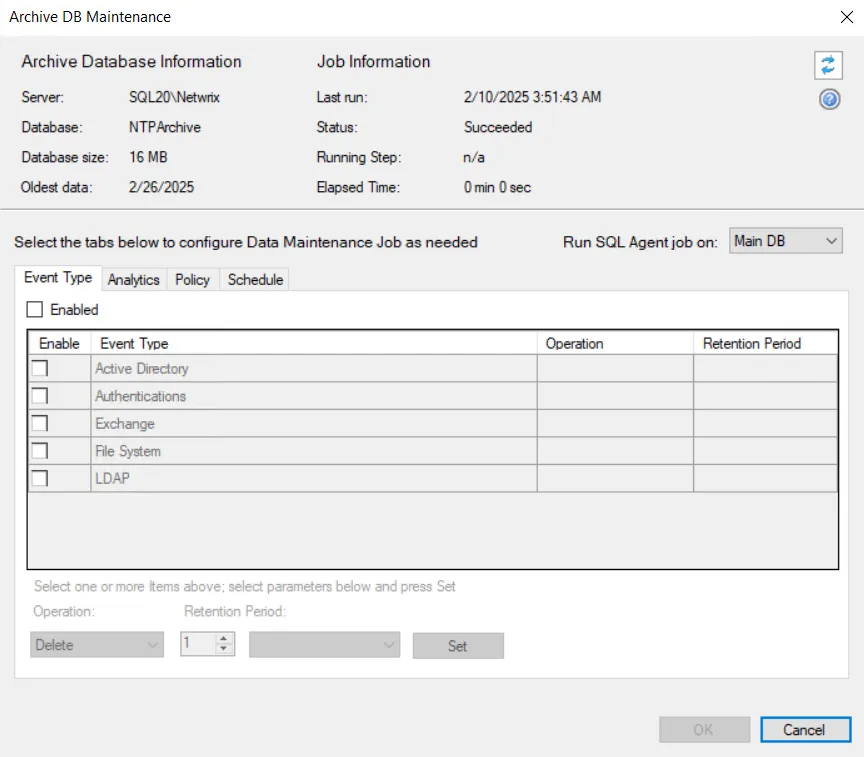
The top of the window displays the following information:
- Archive Database Information:
- Server – SQL Server where Threat Prevention performs database maintenance
- Database – Name of the database
- Database Size – Current size of the database
- Oldest Data – Date of the oldest data in the database
- Job Information:
- Last run – Date timestamp when the last database maintenance job ran
- Status – Status of the job. Different statuses are:
- Idle – Indicates that no database maintenance task is running
- Succeeded – Indicates that the most recent job finished without error
- Running – Indicates that a job is running
- Error – Indicates that the job started but terminated on an error
- Running Step – During job execution, this field populates with the current step
- Elapsed Time – Overall elapsed time of job execution
The Refresh button in the upper-right corner refreshes this database and job information.
Step 3 – From the Run SQL Agent job on dropdown menu, select an option to determine the SQL Agent that runs the maintenance job.
- Select Main DB if the archive database resides on the same SQL Server machine as the NVMonitorData database.
- Select Archive DB if the archive database resides on a different SQL Server machine than the NVMonitorData database.
Step 4 – On the Event Type, Analytics, and/or Policy tabs, enable maintenance for all or some of the options. See the Enable Database Maintenance topic for additional information.
The Event Type Tab, Analytics Tab, and Policy Tab on the Archive DB Maintenance window are the same as on the Database Maintenance window, except that only the 'Delete' operation is available for the archive database.
Step 5 – On the Schedule tab, set the frequency and time when the database maintenance job runs. See the Schedule Database Maintenance topic for additional information.
Step 6 – Click OK on the Archive DB Maintenance window.
Step 7 – Click Save on the Database Maintenance window to save the changes.
Database maintenance is now enabled for the archive database.