EPE Settings Window
You can configure Threat Prevention with Enterprise Password Enforcer (EPE) to use the Have I Been Pwned (HIBP) database. The Netwrix website hosts a copy of this database. The HIBP database contains a list of the hashes of known compromised passwords. During password change operations, you can configure the application to reject passwords with a hash that matches a hash in the HIBP database. The EPE Settings window displays current HIBP database information and configuration options.
You must first deploy the HIBP database to the Enterprise Manager. After Threat Prevention stores the database, you can configure Threat Prevention Agents to obtain and use a local copy of the HIBP database. To give Threat Prevention Agents a local copy of the database, enable the Use Local Pwned hash DB setting in the Deploy Agents wizard's Set Options Window .
Threat Prevention can authenticate password hashes against the stored HIBP database in the following places across the environment:
- Only the Enterprise Manager
- All or selected Threat Prevention Agents
- Mix of the Enterprise Manager and Threat Prevention Agents
Considerations When Deploying the HIBP Database
Before deploying the HIBP database, consider the pros and cons when choosing its deployment location. You can deploy it on the Threat Prevention Agent and/or the Enterprise Manager machine.
Both the Agent and the Enterprise Manager can be in one environment.
If you copy and store the HIBP database on the Agent:
- The HIBP database takes up additional space on the machine where you copy it (approximately 8 GB, but subject to change)
- Checking passwords against the HIBP database doesn't require a network connection to the application server
- The Agent checks the pending password candidate against the archived hash file locally and sends the results to the Enterprise Manager. If a password hash matches, Threat Prevention rejects the pending password change.
- The Enterprise Manager periodically compares its HIBP database version against the Agent's local copy. If the Enterprise Manager has a newer copy, it updates the Agent copy.
If you keep the HIBP database only on the Enterprise Manager:
-
The database takes up space only on the Enterprise Manager machine, not on the Agent machine
-
Requires a working network connection from the Agent to the Enterprise Manager to check:
- The pending password candidate from the Agent
- For and obtain updates to the HIBP database
-
The Agent sends the candidate hash value to the Enterprise Manager to compare against the Enterprise Manager’s copy of the HIBP database
- The advantage of this approach is that the domain controllers don't need space for the HIBP database. The disadvantage is that at the time of a password change, if the Enterprise Manager isn't available, the Agent must assume the hash is okay.
Configuration Settings
Click Configuration > EPE Settings on the menu to open the EPE Settings window.
The EPE Settings window is only available to Threat Prevention administrators.
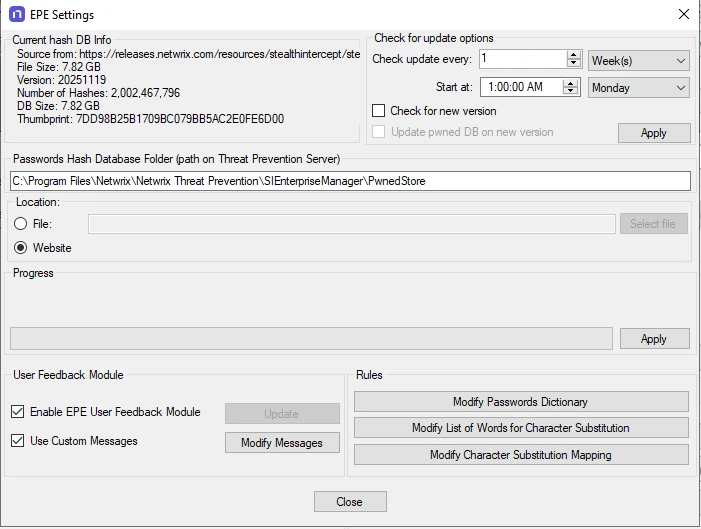
The window displays current hash database information and has the following configuration settings, displayed in sections on the window.
Current Hash DB Info
Threat Prevention enables the Current hash DB Info area after you deploy the HIBP database to Enterprise Manager for the first time. It displays the source you downloaded the database from, its size, version, and the number of hashes it contains. It also shows a thumbprint value that changes whenever the content of the Hash DB changes.
The publisher updates the HIBP dataset at random intervals. It can go weeks or even months with no changes.
Check for Update Options
The Check for Update options area specifies when Threat Prevention checks the Netwrix website for a new version of the HIBP database.
Threat Prevention enables these options after you deploy the HIBP database to Enterprise Manager for the first time.
Configure the following options:
-
Check update every [number] [unit of time] – Select how often Threat Prevention checks the Netwrix website for a newer version of the HIBP database
-
Start at [time] [day] – Select the time and day when Threat Prevention checks the Netwrix website for a newer version of the HIBP database
-
Check for new version – Checks the Netwrix website for the latest password hash file details and compares the SHA-1 to the local hash file to determine if the website has a newer version of the HIBP database. If you select only this option, Threat Prevention generates an alert in the Administration Console when it detects a new version.
noteThis checkbox doesn't automatically download the new HIBP database version.
-
Update pwned DB on new version – Checks the Netwrix website for HIBP updates and then updates the Enterprise Manager server if it detects a new version
After making selections, click the Apply button to enable checking for updates at the scheduled intervals.
Passwords Hash Database
Threat Prevention uses the Passwords Hash database to check if users’ new and pending password (i.e. during a password reset) matches the hash of a compromised password from a data breach.
First-time configuration of this window requires downloading the HIBP database from the Netwrix website. If the Administration Console doesn't have internet access, see the Download and Configure the Have I Been Pwned Hash List topic for instructions.
Ensure the initial update of the database occurs during non-office hours. Due to the size of the hash file, this download takes up a significant amount of CPU and download time.
- Passwords Hash Database Folder (path on Threat Prevention Server) – Central location of the Pwned database on the application server. The default path is:
…\Netwrix\Netwrix Treat Prevention\SIEnterpriseManager\PwnedStore
-
Location:
-
File – If the application server doesn't have internet access, you can manually download the HIBP database and select the File radio button to browse to your local copy of the database.
Database Download link:
SHA-256 hash for the database:
-
Website – This option points to the Netwrix website that hosts a copy of the latest HIBP database. This is the default option and the preferred method if the application server has internet access.
-
-
Apply:
- If you select Website, clicking Apply downloads the HIBP database from the Netwrix website and then processes the database for use by the application
- If you select File, clicking Apply processes the local copy of the (manually obtained) database for use by the application
User Feedback Module
The optional EPE User Feedback module (also known as the Credential Provider) provides feedback to end users by listing the reasons the Enterprise Password Enforcement (EPE) event type has rejected a candidate password.
EPE offers multi-language support, ensuring users receive clear and consistent password rejection messages. Supported languages are:
- Chinese Simplified
- Chinese Traditional
- Czech
- Dutch
- English
- French
- German
- Hungarian
- Italian
- Japanese
- Korean
- Polish
- Portuguese
- Spanish
- Thai
You must deploy the module to end user computers.
The User Feedback Module section has the following check boxes:
- Enable EPE User Feedback Module – Select this checkbox to enable integration between an optional EPE User Feedback module and the Threat Prevention Agent on a domain controller. Click Update to apply the current state of the checkbox to the module.
- Use Custom Messages – Select this checkbox and click Modify Messages to open the Custom Messages Editor window, where you can customize password rejection messages for the EPE User Feedback module.
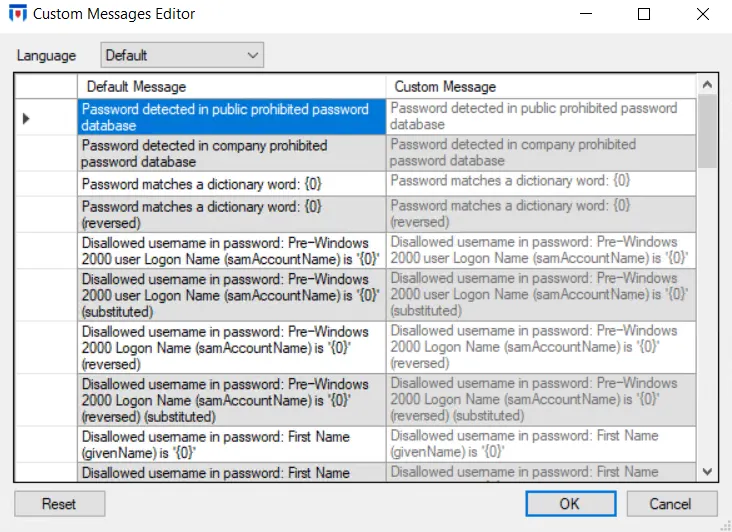
By default, messages are available in English.
- Use the Language dropdown menu to select a language, The Default Message column displays messages in English while you can edit the Custom Message column to provide the message in the selected language.
- To edit, double-click a row in the Custom Message column and enter a message. Click OK to save changes or Cancel to discard them. Select Reset to revert all customized messages back to defaults.
The string "0" is a placeholder that Threat Prevention populates at run time with the specific values that led to the password rejection. Include "0" in all custom messages where you want to display that run-time information.
Rules
The following windows are global settings for the EPE Password Rules filter within the EPE Settings window. Threat Prevention applies whatever you configure in these windows across all EPE Password Rules filters in the Administration Console.
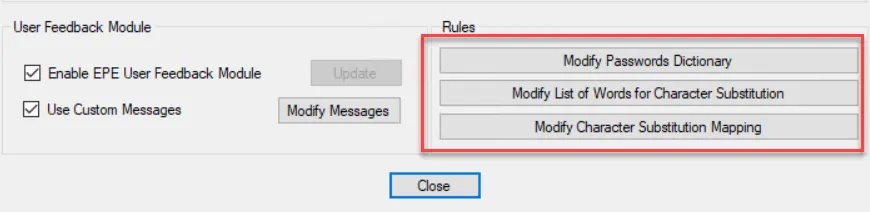
You can monitor or block an event with these global settings:
- Modify Password Dictionary – Requires an exact match between a user entered password and the password in the dictionary
- Words List of – Global list of character substitutions found in passwords. Uses the Substitution Editors map to check all permutations of a pending password.
- Substitutions Editor – Create a character substitution map used to create password permutations for the Words List dictionary
Password Dictionary Window
The Password Dictionary window is a global setting used across all EPE policies. It contains a centralized copy of the dictionary.dat file. This modifiable file contains all compromised passwords. You can add, remove, and modify passwords in the list.
For Threat Prevention to reject a password, the user's pending password must exactly match a password in the Password Dictionary list.
Click the Modify Passwords Dictionary button in the Rules area on the EPE Settings window. The Password Dictionary window opens.
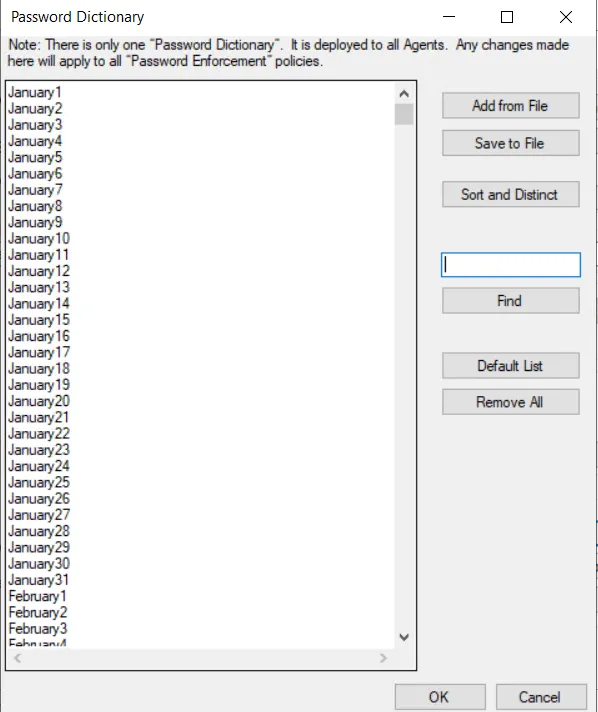
The buttons on the right have the following functions:
- Add From File – Uploads passwords (one password per line) from a TXT file
- Save To File – Opens a Save As window to save the current configuration to a TXTt file at a desired location
- Sort and Distinct – Automatically removes duplicates and sorts passwords in alphanumeric order
- Find – Use the textbox to search for a password
- Default List – Resets the password values to the original list provided during installation. This discards any modifications.
- Remove All – Deletes all passwords from the window
Click OK to push modifications to all active Threat Prevention Agents. Inactive Agents get the updated list when they reconnect to the Enterprise Manager. Select Cancel to close the window and discard your changes.
Words List Dictionary Window
The Words List Dictionary window is a global setting used across all EPE policies. It contains a user provided global list of character substitutions found in passwords. This feature uses the entries in the Substitutions Editor to check all permutations of a user entered password. If the password matches a substitution rule, Threat Prevention blocks it.
Click the Modify List of Words for Character Substitution button in the Rules area on the EPE Settings window. The Words List Dictionary window opens.
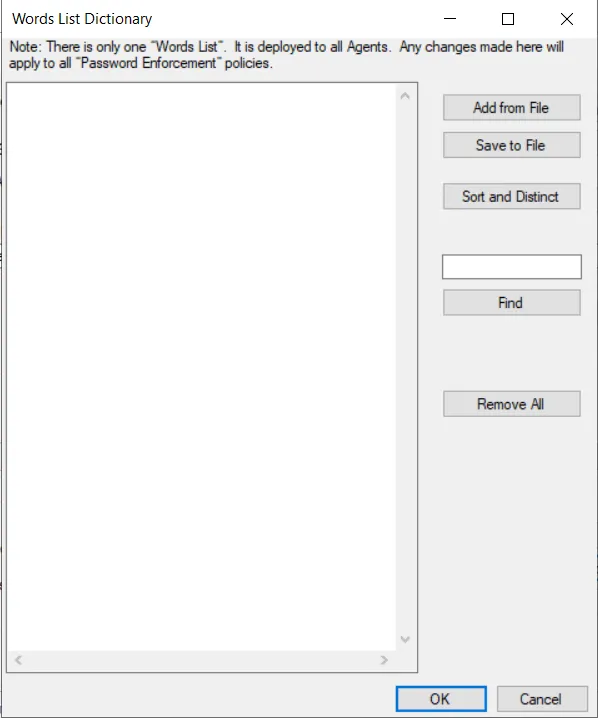
You can add, remove, and modify passwords here. The buttons on the right have the following functions:
- Add From File – Uploads passwords (one password per line) from a TXT file
- Save To File – Opens a Save As window to save the current configuration to a TXTt file at a desired location
- Sort and Distinct – Automatically removes duplicates and sorts passwords in alphanumeric order
- Find – Use the textbox to search for a password
- Remove All – Deletes all character substituted passwords from the window
Click OK to push modifications to all active Threat Prevention Agents. Inactive Agents get the updated list when they reconnect to the Enterprise Manager. Select Cancel to close the window and discard your changes.
Substitutions Editor Window
The Substitutions Editor window is a global setting used across all EPE policies. This editor stores character substitutions and their associated replacements as rules (i.e. A = @). The Words List Dictionary applies these rules when checking all permutations of a user entered password.
All entries in the sequence column must be unique.
For example: if you add “Goal” to the Word List Dictionary and add A=@ and O=0 to the substitutions editor, Threat Prevention blocks the pending passwords “Go@l” and “G0al”.
Click the Modify Character Substitution Mapping button in the Rules area on the EPE Settings window. The Substitution Editor window opens.
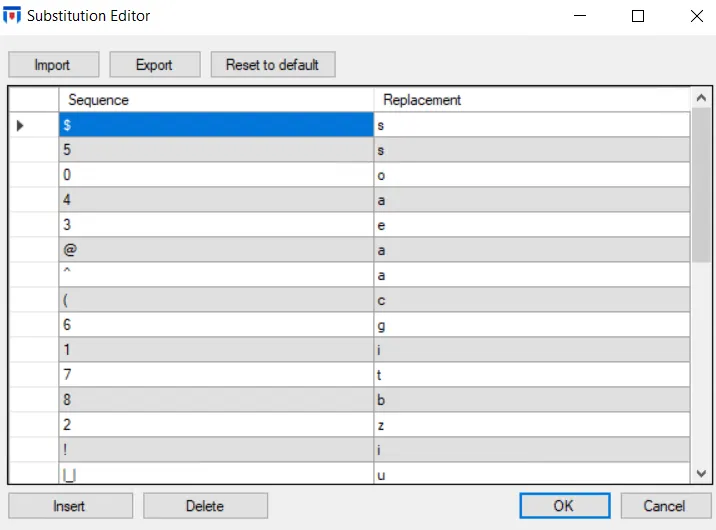
The Substitutions Editor has the following options:
-
Import – Imports a full set of the character substitutions from a user specified file
-
Export – Saves the current set of character substitutions to a user specified file
-
Reset to default – Resets the character substitutions to the original list provided during installation. This discards any modifications.
-
Insert – Displays a custom row for the user to enter Sequence and Replacement values
note
Threat Prevention inserts the new row underneath the highlighted row. :::
- Delete – Removes a single row from the Substitutions Editor list. You can delete only one row at a time.
Click OK to save the changes and close the window. Click Cancel to close the window and discard any changes.
Download and Configure the Have I Been Pwned Hash List
If the Administration Console doesn't have internet access, you can manually download the HIBP database.
The Pwned Passwords Downloader is a .NET tool that downloads all Pwned Passwords hash ranges and saves them offline, so you can use them without depending on the k-anonymity API. Use this tool to get the latest breached hashes from the Have I Been Pwned (HIBP) database.
See the Have I Been Pwned website for more information about the HIBP database.
The Pwned Passwords Downloader is a third party, open source tool, created by the HaveIBeenPwned team and distributed under a BSD 3-Clause License. You might experience issues during the hash download process, depending on your threading settings or the load on the CloudFlare backend. The Pwned Passwords Downloader tool automatically retries until it completes the download process.
Prerequisites
The Pwned Passwords Downloader has the following prerequisite:
- Install .NET 6 before installing the Pwned Passwords Downloader tool. You can download .NET 6 from Microsoft: https://dotnet.microsoft.com/en-us/download/dotnet/6.0
The Have I Been Pwned database (HIBP) hashes can take up to 30 GB. Ensure that you have enough free space on your disk.
Install the Pwned Passwords Downloader
To install the Pwned Passwords Downloader:
Step 1 – Open command prompt, and navigate to your .NET install folder (for example,
C:\Program Files (x86)\dotnet).
Step 2 – Run the following command:
dotnet tool install --global haveibeenpwned-downloader
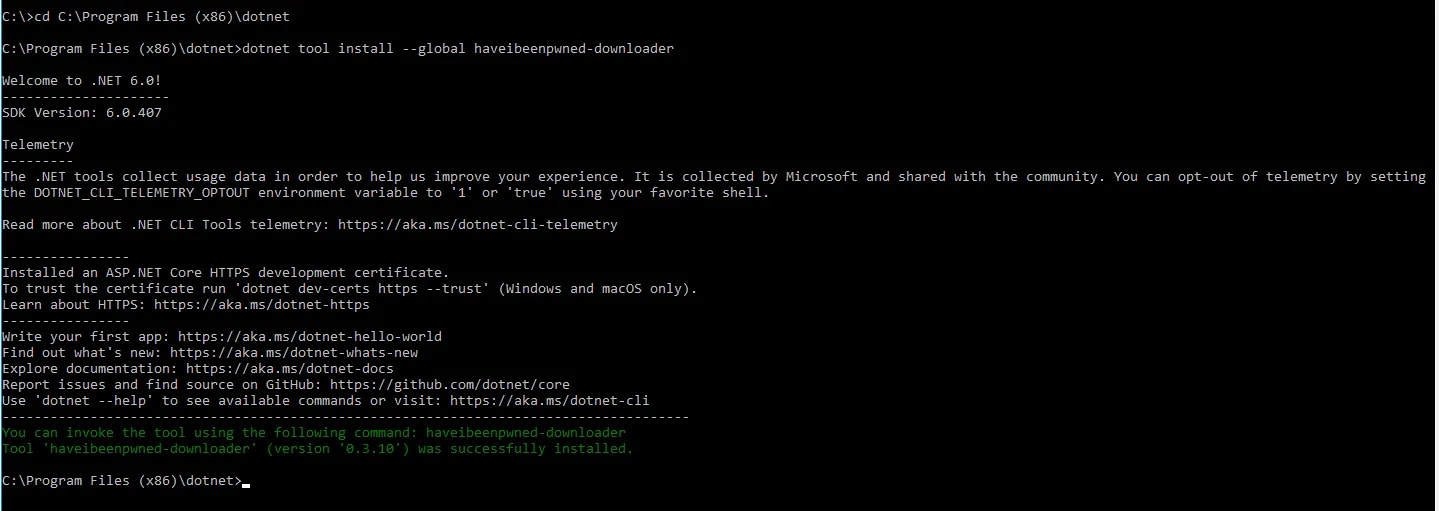
Step 3 – Close the command prompt.
Update an Installed Pwned Passwords Downloader
To update an installed Pwned Passwords Downloader:
Step 1 – Open the command prompt.
Step 2 – Run the following command:
dotnet tool update --global haveibeenpwned-downloader

Download NTLM Hashes with the Pwned Passwords Downloader
To download NTLM hashes:
Step 1 – Navigate to the folder where you want to download the hashes.
Step 2 – Download all NTLM hashes to a single txt file, called for example
pwnedpasswords_ntlm.txt.
Run the following command:
haveibeenpwned-downloader.exe -n pwnedpasswords_ntlm
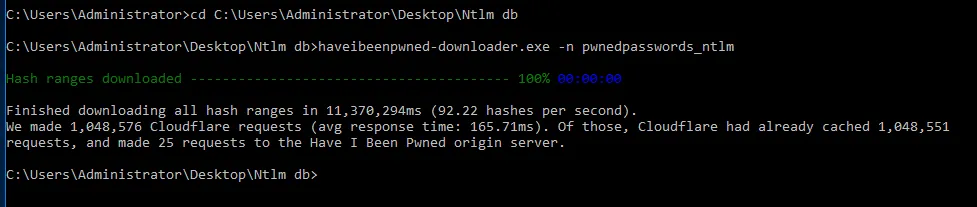 This screenshot shows the completed download.
Step 3 – To overwrite an existing hash list, run the following command:
haveibeenpwned-downloader.exe -n pwnedpasswords_ntlm -o
For a complete list of available parameters, check the Pwned Passwords Downloader GitHub page.