Trusted Domains Blacklist Window
To fill in the account details on an event, the Agent resolves distinguished names, security identifiers (SIDs), and service principal names (SPNs) over LDAP. It doesn't know in advance which domain holds a given account, so it queries every domain the monitored domain trusts, until one answers.
When the Agent can't reach one of those trusted domains, each query to it has to time out before the Agent moves on. A domain isolated in a perimeter network, or a cross-forest trust the domain controller has no route to, can hold up a single lookup for a minute or more. Under a steady flow of events, the lookups fall behind, the Agent's event queue fills, and the Agent reports that it lost events.
The Trusted Domains Blacklist lists the domains the Agent must never query. The Agent skips a domain on the list rather than querying it, so account resolution no longer waits for it. You set the list per monitored domain, because a domain that is unreachable from one domain controller may be perfectly reachable from another.
Blacklisting a domain means the Agent can't resolve accounts that live in it. The Agent still captures events involving those accounts, but the account details on them may be incomplete. Blacklist only the domains that don't answer.
Configure the Blacklist
To blacklist a trusted domain:
Step 1 – Click Configuration > Trusted Domains Blacklist on the menu to open the Trusted Domains Blacklist window.
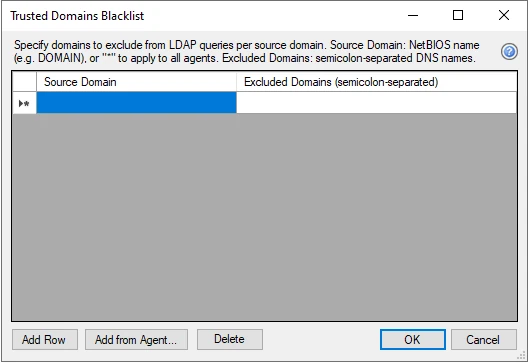
The window holds one row per source domain, with the following columns:
- Source Domain – The NetBIOS name of the monitored domain the row applies to, for example
NWXTECH. Enter an asterisk (*) to apply the row to every Agent. - Excluded Domains (semicolon-separated) – The DNS names of the domains the Agent must never query,
separated by semicolons, for example
dmz.example.com;partner.example.net.
Step 2 – Click Add Row to add an empty row, and then enter the source domain and the excluded domains.
To pick the excluded domains from the trusts an Agent reports rather than typing their names, click Add from Agent… instead.
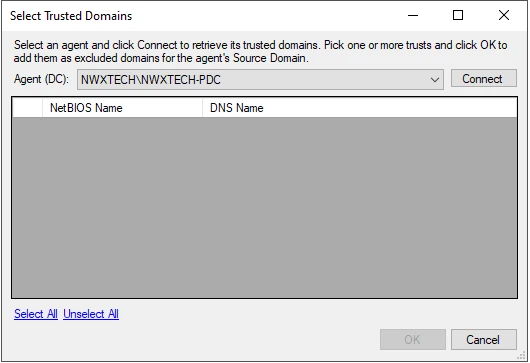
- Select the Agent in the Agent (DC) list and click Connect to retrieve the domains it trusts. The list shows each one with its NetBIOS name and its DNS name.
- Check the domains to exclude, or use Select All and Unselect All, and then click OK. Threat Prevention adds those domains as the excluded domains for that Agent's source domain.
Step 3 – To remove a row, select it and click Delete.
Step 4 – Click OK.
The Enterprise Manager sends the updated list to the Agents. You don't need to restart the Agents.
The Enterprise Manager delivers the blacklist to the Agents, so both must run version 8.1 or later. Upgrade the Enterprise Manager, Administration Console, and Agents together. See the Upgrade Procedure topic for additional information.
Confirm That a Domain Is the Cause
Before blacklisting a domain, confirm it's the one holding up resolution. Enable debug logging for account resolution on the Agent and look for directory searches that take tens of seconds against a single domain, or that fail reporting that the server isn't operational. See the Log Files and Logging Configuration topic for additional information.
After you blacklist the domain, the Agent records each skipped domain in its log at the debug level.
See the Event Filtering Configuration Window topic for additional information on reducing the volume of events an Agent processes.