Pre-Created Templates
Threat Prevention comes with several policy templates that cover a wide range of event monitoring and lockdown. The initial Threat Prevention installation process provides pre-created policy templates. You can create new policy templates from the beginning or from existing policies.
When you upgrade Threat Prevention, new and updated policy templates are available for import. The installation of the latest version doesn't import them automatically. You can update existing templates for a new release. See the Upgrade Policy Templates topic for additional information.
When you launch the Administration Console for the first time, it asks the administrator to import pre-created policy templates. If the administrator doesn't import the templates, you can import them later. See the Import Templates topic for additional information. After you import the templates, they are available through an organized folder structure.
Template Folders
Threat Prevention organizes the pre-created policy templates in a folder structure under Templates in the Templates Interface.
-
The Actions folder contains several pre-configured PowerShell scripts that you can use as response actions to alerts.
-
The ADCS folder contains several pre-configured templates to detect and prevent AD Certificate Services attacks.
-
The templates that Netwrix engineers deem most useful are located within subfolders in the Best Practices folder:
- Active Directory
- Exchange
- File System
- Object Lockdown
-
The Domain Persistence folder contains templates of policies that detect an attacker's attempt to gain persistent administrative access to Active Directory.
-
Templates focused on monitoring for HIPAA regulations are located within subfolders in the HIPAA folder:
- 164.306 – Security Standards
- 164.308 (a)(1)(i) – Security Management Process
- 164.308 (a)(1)(ii) – Implementation Specifications
- 164.308 (a)(3)(i) – Workforce Security
- 164.308 (a)(3)(ii) – Authorization and Supervision
- 164.308 (a)(4) – Information Access Management
- 164.308 (a)(5)(ii)(C) – Log-In Monitoring
- 164.308 (a)(5)(ii)(D) – Password Management
- 164.312 (a)(1) – Access Control
- 164.312 (b) – Audit Controls
- 164.312 (c) – Integrity
- 164.312 (d) – Authentication
-
The LDAP folder contains templates that monitor LDAP queries.
-
Templates that are focused on monitoring and locking down events in a Microsoft environment are located within subfolders in the Microsoft folder:
- Active Directory
- DNS
- Exchange
- File System
- Group Policy Objects
- LSASS
-
The Netwrix Threat Manager folder contains templates used by Netwrix Threat Manager to perform threat detection.
-
The Privilege Escalation folder contains templates that detect an attacker's attempt to escalate the privileges of a compromised user to gain Domain Admin rights in Active Directory.
-
The Ransomware folder contains templates that detect the creation of files known to be associated with a Ransomware attack.
-
The Reconnaissance folder contains templates that detect an attacker's attempt to discover useful resources to escalate permissions, gain Domain Amin persistence, or exfiltrate information.
-
The Schema and Configuration folder contains templates that audit changes that happen to data stored in the schema or configuration container, such as site creation or attributes being indexed.
-
The SIEM folder contains templates that monitor the most common events sent to SIEM products.
Import Templates
Threat Prevention stores the pre-created policy templates in the SI_Templates_All.xml file. If you
didn't import them when you first launched the Administration Console, you can import them later by
following these steps.
Step 1 – Click Tools > Import on the menu. The Import window opens.
Step 2 – In the Select Import File box, click the ellipsis (…) to open the browser window. The location of the default templates is:
…\Netwrix\Netwrix Threat Prevention\SIWinConsole
Step 3 – To import all the available Threat Prevention policy templates, select the
SI_Templates_All.xml file. Click Open.
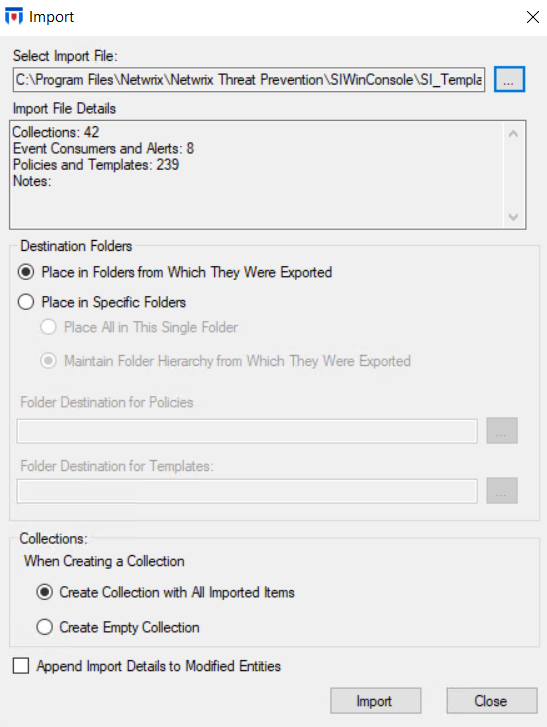
Step 4 – The Import window auto-fills with the import file details. Don't change the defaults settings. Click Import.
The import process can take a few minutes to complete as there are several hundred templates to import and configure.
Step 5 – When the operation is complete, click OK.
The templates are now available in the Templates Interface.