Import Window
You may need to export collections, policies, and templates from the Administration Console and them import them back for certain reasons, such as during a reinstall. The Export Policies and Templates Window exports these items to an XML file. See the Export Policies and Templates Window topic for additional information on export.
Use the Import window to select an already exported XML file for import and configure the import settings.
To import the file:
Step 1 – Open the Import window in any of the following ways:
- Click Tools > Import on the menu.
- Use the keyboard shortcut (Alt+I).
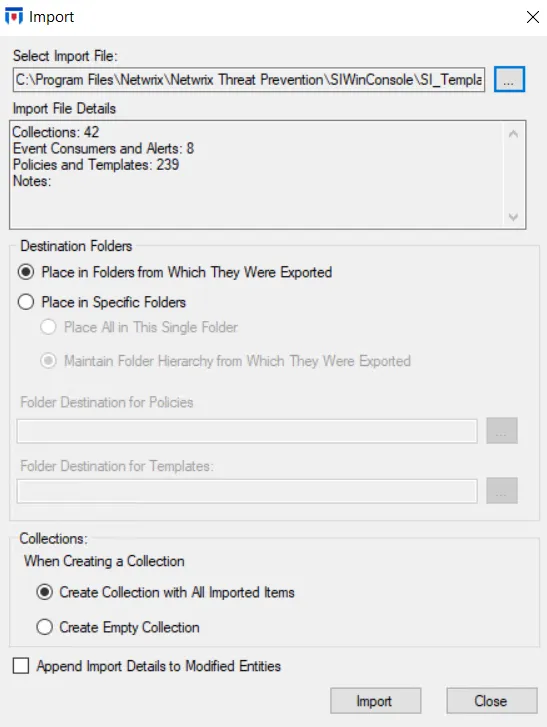
The Import window includes options for specifying where to save imported policies and templates, and how to handle duplicate items.
Step 2 – In the Select Import File section, use the ellipsis (…) to browse for the XML file to import. After you select it, the Import File Details box displays statistical information on what Threat Prevention will import and the notes you added while exporting the file.
Step 3 – Use the Destination Folders section to specify a folder from within the folder structure in the Navigation pane for saving the policies and/or templates imported from the XML file. For policies, you can specify a folder under the Policies node in the navigation pane. For templates, you can specify a folder under the Templates node.
You can't create new folder locations.
Select one of the following option buttons:
- Place in Folders from Which They Were Exported – Imports the policies and templates to the same folders as the ones in which they existed at the time of export.
- Place in Specific Folders – Choose an option button:
- Place All in This Single Folder –Select this option and then use the Folder Destination for Policies and/or Folder Destination for Templates box to select a folder for importing the policies and/or templates respectively. Threat Prevention imports all policies from the XML file to the selected folder, ignoring any folder hierarchy mentioned in the XML file. The same is true for templates.
- Maintain Folder Hierarchy from Which They Were Exported – Select this option and then use the Folder Destination for Policies and/or Folder Destination for Templates box to select a folder for importing the policies and/or templates respectively. Threat Prevention imports all policies from the XML file with the selected folder acting as the parent folder, and re-creates any folder hierarchy as it was at the time of export. The same is true for templates.
Use the ellipsis (…) next to the Folder Destination for Policies and/or Folder Destination for Templates box to browse for the folder where you want to import the policies and/or templates respectively.
- For policies, the Select Folder window limits you to select a location under the Policies node in the Navigation pane.
- For templates, the Select Folder window limits you to select a location under the Templates node in the Navigation pane.
Step 4 – In the Collections section, select an option button:
- Create Collection with All Imported Items
- Create Empty Collection
Step 5 – Check the Append Import Details to Modified Entries checkbox to append the import information to a pre-existing item instead of overwriting it. This means that if a policy, template, or collection exists in the system with the same name as in the XML file, the system will add the information from the XML file to it. If this checkbox isn't checked, the system will overwrite the existing policy, template, or collection with the respective item from the XML file.
Step 6 – After you set the options as desired, click Import.
Threat Prevention imports the information from the XML file as per the configured settings.