DB Connection Manager Wizard
Use the Database Connection Manager (SIDBConfigMgr.exe) to update the connection options for the NVMonitorConfig and NVMonitorData databases. You originally configure the databases during the initial install of the Enterprise Manager package. See the Application Server Install topic for additional information.
Remember, the Events Database Configuration Window displays the host, port, and user for the NVMonitorConfig and NVMonitorData databases. The current Archive Database settings are located on the Archive DB tab of the Database Maintenance window. See the Archive Data topic for additional information.
To manage database settings on the DB Connection Manager Wizard:
Step 1 – Navigate to the following location on the Threat Prevention server:
...\Netwrix\Netwrix Threat Prevention\SIEnterpriseManager
Step 2 – Double-click SIDBConfigMgr.exe to launch the Netwrix Threat Prevention DB Connection Manager wizard.
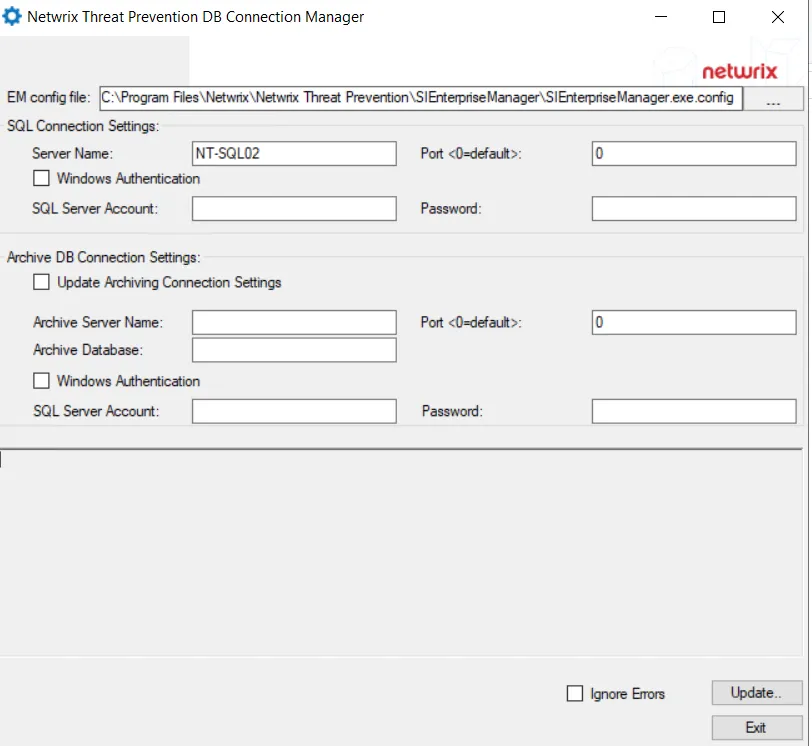
Step 3 – You can update the following:
- EM config file – Displays the current location of the SIEnterpriseManager.exe.config file. Use the ellipsis (...) to locate the configuration file if it isn't available at the default location. The default location is:
...\Netwrix\Netwrix Threat Prevention\SIEnterpriseManager\SIEnterpriseManager.exe.config
The Database Connection Manager application generates a new connection string to either the NVMonitorConfig/NVMonitorData database or the Archive database. To update either of these strings, you must provide information in the corresponding section, SQL Connection Settings or Archive Database Connection Settings, before clicking the Update button, which generates a new connection string for that database.
-
SQL Connection Settings:
- Server Name – Current SQL Server
- Port – Port number for access to the SQL Server
- Windows Authentication – By default, the connection to the SQL Server that hosts the database uses SQL Server authentication. Select this checkbox to use Windows authentication instead.
- SQL Server Account/Windows Account – This label depends on whether you select the Windows Authentication checkbox or not. Provide the username for the account that has the necessary credentials to access the SQL Server
- Password – Password of the account
-
Archive DB Connection Settings:
-
Update Archiving Connection Settings – The settings in this section apply if you select this checkbox
- Archive Server Name – The SQL Server where the Archive database resides
- Port – Port number for access to the Archive database
- Archive Database – Name of the Archive database
-
Windows Authentication – By default, the connection to the SQL Server that hosts the database uses SQL Server authentication. Select this checkbox to use Windows authentication instead.
When you select this checkbox, the SQL Server Account and Password boxes are disabled.
-
SQL Server Account – Username for the account that has the necessary credentials to access the SQL Server
-
Password – Password of the account
-
Step 4 – The system verifies the new connection string data for the selected SQL server. The Ignore Errors checkbox controls the behavior when the system encounters an error when attempting to connect:
- Unchecked – The system discards the connection string if it encounters any errors when you click the Update button.
- Checked – The system ignores all errors and updates the connection string without verification against the SQL Server
Step 5 – Click the Update button to re-create the connection string for the database settings and test the new credentials against the SQL server, or click Exit to cancel any changes.