Credential Profile Page
The Credential Profile page within the Integrations interface lists all of the credentials the application uses to complete tasks. The application stores these credentials securely.
Use the gear icon in the upper right corner of the console to open the Configuration menu. Then select Integrations to open the Integrations interface.
Click Credential Profile in the navigation pane to view a list of the already created Credential Profiles, if any.
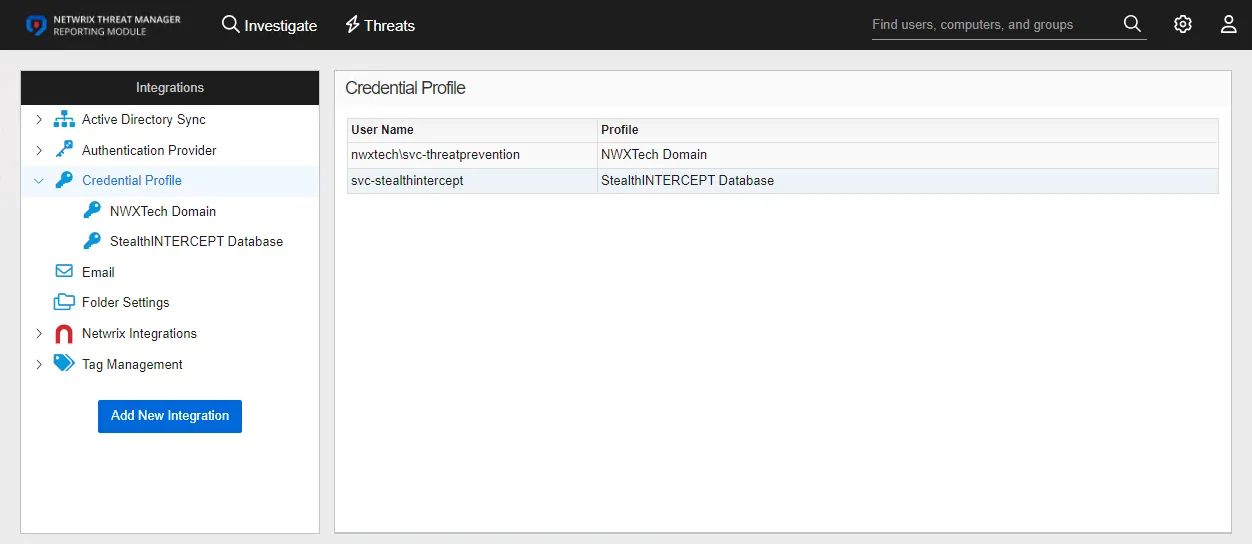
The table displays the user name for each profile. To view profile details or make modifications, select a profile from the table or under Credential Profile in the navigation pane.
See the Reporting Module Server Requirements topic for a list of permission requirements for each type of task.
Best Practice Recommendation
As a best practice:
- Create one Credential Profile per domain for Active Directory Sync purposes
- Create a Credential Profile with Writer permissions to the shared folder where the application stores subscription exports
Add a Credential Profile
To add a Credential Profile:
Step 1 – Use the gear icon in the upper right corner of the console to open the Configuration menu. Then select Integrations to open the Integrations interface.
Step 2 – On the Integrations interface, click Add New Integration in the navigation pane. The Add New Integration window opens.
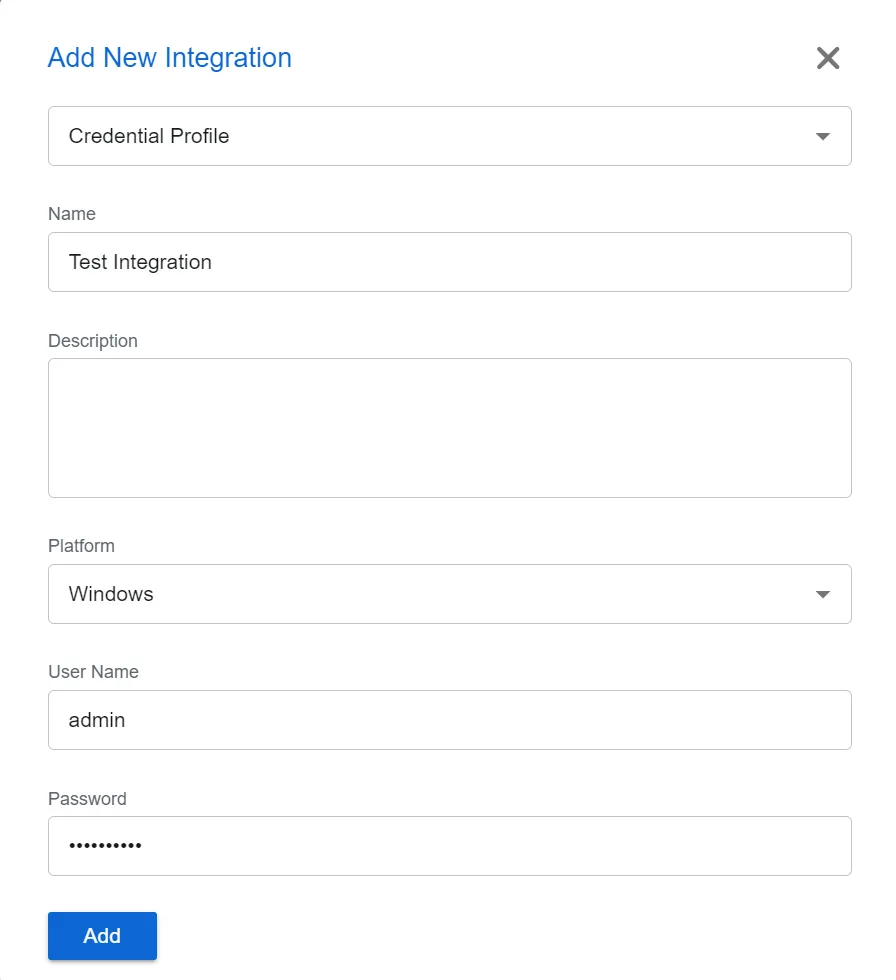
Step 3 – In the Type dropdown menu, select Credential Profile.
Step 4 – Enter the following information:
-
Name – Provide a unique, descriptive name for the Credential Profile
-
Description – Provide a description for the Credential Profile
-
Platform – Select the account type for the credential:
- SQL – For SQL Server accounts
- Windows – For local and Active Directory accounts
-
User Name – Enter the account user name in the required format. For Windows accounts, it is: [DOMAIN][USERNAME], e.g. NWXTech\svc-netwrix
-
Password – Enter the password for the credential
Step 5 – Click Add. The Add New Integration window closes.
The Credential Profile appears in the Integrations navigation pane. Repeat the process to add additional Credential Profiles.
Credential Profile Details
To view the details of a Credential Profile:
Step 1 – Use the gear icon in the upper right corner of the console to open the Configuration menu. Then select Integrations to open the Integrations interface.
Step 2 – On the Integrations interface, click Credential Profile in the navigation pane to view a list of the already created Credential Profiles, if any.
Step 3 – Select a Credential Profile from the table or the navigation pane to view its details.
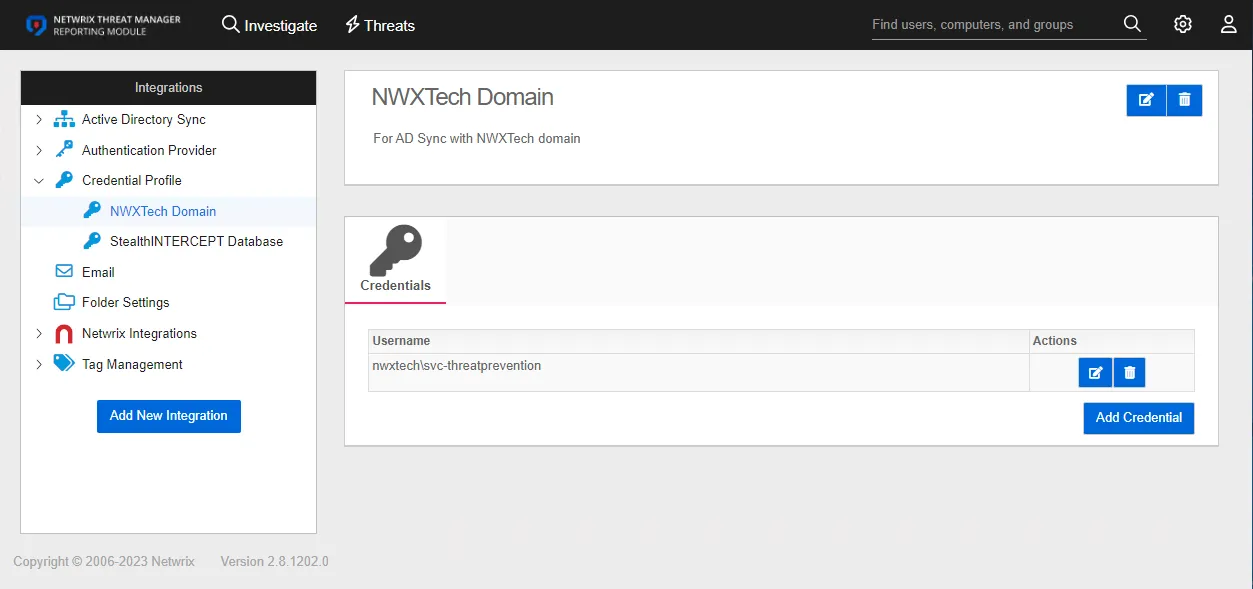
Select the profile from the list to see modification options. The page displays the following information for a Credential Profile:
-
Name and Description – The box at the top displays the name and description of the profile
- Edit – The edit button in the upper right corner of the box changes those fields from read-only to editable. See the Edit Profile topic for additional information.
- Delete – The delete button in the upper right corner of the box opens the Delete Profile window to confirm the action
-
Credentials – This section displays the credentials
- Edit Credential – The edit button to the right of the credentials opens the Credentials Settings window, where you canupdate the Platform, User Name, or Password. See the Edit Credential topic for additional information.
- Delete Credential – The delete button to the right of the credentials opens the Delete Credential window to confirm the action
- Add Credential – Use this button to add additional credentials to this profile. This functionality is available for a full Netwrix Threat Manager implementation, and doesn't apply to the Netwrix Threat Manager Reporting Module.
Edit Profile
To edit a Credential Profile name and/or description:
Step 1 – Use the gear icon in the upper right corner of the console to open the Configuration menu. Then select Integrations to open the Integrations interface.
Step 2 – On the Integrations interface, click Credential Profile in the navigation pane to view a list of the already created Credential Profiles, if any.
Step 3 – Select a Credential Profile from the table or the navigation pane.
Step 4 – Click the Edit button in the upper right corner of the name and description box.

Step 5 – To modify the profile name, type in the top field.
Step 6 – To modify the profile description, type in the bottom field.
Step 7 – Click the Save button.
The Credential Profile now uses the modified name and/or description.
Edit Credential
Use the following steps to edit a credential within a Credential Profile. This may be necessary if you need to update the account password.
Step 1 – On the Integrations interface, click Credential Profile in the navigation pane to view a list of the already created Credential Profiles, if any. Select a Credential Profile.
Step 2 – In the Credentials box, click the edit button to the right of the credential. The Credential Settings window opens.

Step 3 – To edit the platform type, select either SQL or Windows from the Platform dropdown menu.
Step 4 – To edit the account user name, enter the account user name in the required format of [DOMAIN][USERNAME], e.g. NWXTech\svc-netwrix.
Step 5 – To update the password, enter the account password in the Password field.
Step 6 – Click Save. The Credential Settings window closes.
You have now modified the credential within the Credential Profile.