User Access Page
The User Access page within the System Settings interface displays users and groups with their assigned roles for console access.
Use the gear icon in the upper right corner of the console to open the Configuration menu. Then select System Settings to open the System Settings interface.
Click User Access in the navigation pane.
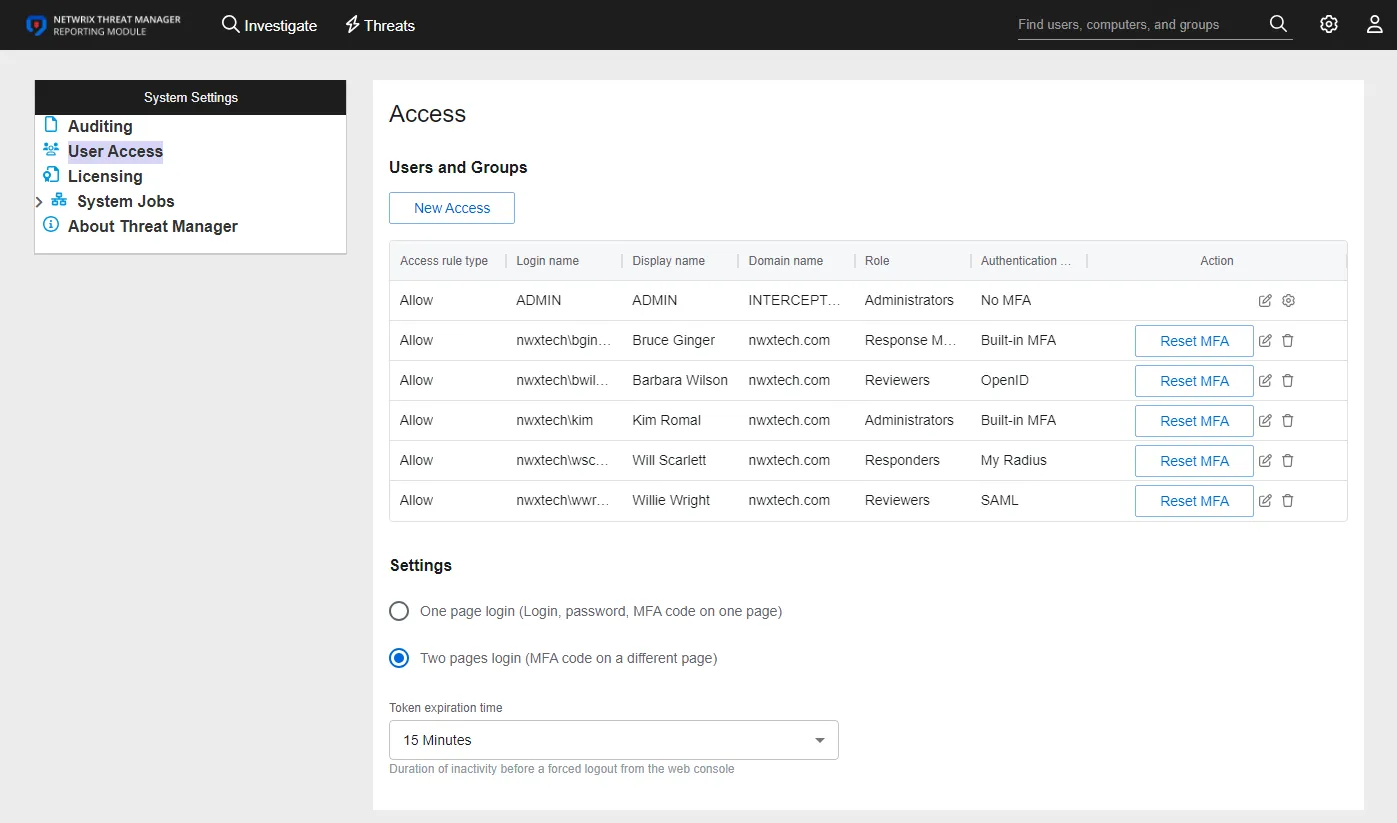
The application assigns roles by the following methods:
-
Group Membership – Members of the group receive the assigned role
noteIf a user is a member of multiple assigned groups, the application assigns the group with the highest level of privilege
-
Direct User Assignment – Assigns a role directly to a user
noteIf you assign a role directly to a user, it takes priority over any assigned group membership roles
The User Access page has the following sections:
- Users & Groups – Use it to allow or deny console access and configure authentication types for users and groups. See the Users & Groups topic for additional information.
- Settings – It lets you customize the user login page and configure the token expiration time for authenticated users. See the Settings topic for additional information.
Users & Groups
The Users & Groups section lets you allow or deny console access and configure authentication types for users and groups.
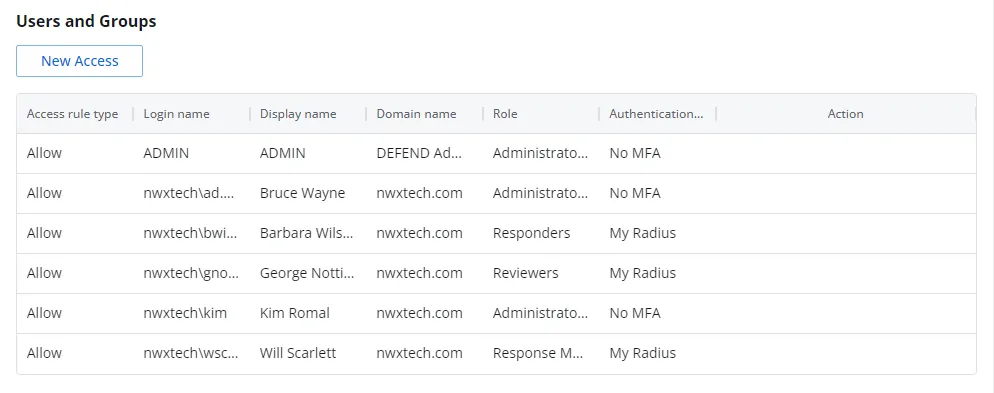
The table displays the following information:
-
Access rule type – Indicates the access type as Allow, which enables console access, or Deny, which disables console access
noteDisabling a user or group disables that level of access. It doesn't block the user or group from logging into the console if they have access through another role assignment.
-
Login name – The NTStyle domain name for the user or group account
-
Display name – The display name for the user or group account
-
Domain Name – Name of the domain. This may be either the domain DNS name or domain controller hostname. For the built-in ADMIN account, the domain is INTERCEPT Admin.
-
Role – The role assigned to the user or group for accessing this application. See the Roles Defined topic for additional information.
-
Authentication Type – Type of MFA authentication assigned to the user or group. See the Authentication Types Defined topic for additional information.
-
Action – This column has the following icons for conducting actions on the user or group:
- Edit icon – Use it to edit the columns in the selected row by enabling dropdown menus. The edit icon changes to a save icon while in edit mode. See the Edit Console Access topic for additional information.
- Trash icon – Opens a Warning window to confirm the action of deleting the user or group. Removing a user or group removes console access for it. You can't remove access for the builtin "ADMIN" account until you grant another account administrative access to the console.
- Reset MFA button – Forces the user or every user in the group to reconfigure MFA on the next login. This option is only available if an MFA authentication type is applied to the user or group.
- Change Password icon – Only available for the built-in ADMIN account. This icon opens the Edit password for build-in admin window. See the Edit Built-in Admin Password topic for additional information.
The New Access button opens the Add Console Access window. See the Add Console Access topic for additional information.
Roles Defined
You can assign the following roles to users and groups:
-
Administrator – This role provides unrestricted access to all functionality
-
Report Reviewer – This role can only use investigations that you directly assign to them
- No access to Configuration pages
- Only has access to the investigation pages
- Can only see and run saved investigations that you assign to them
- Unable to save Investigations or modify exiting Investigations
- Can export reports they have access to
-
Responders – This role allows users or groups to run Investigations
- No access to Configuration pages
- Unable to save Investigations or modify exiting Investigations
-
Reviewers – This role allows users or groups to run Investigations
- No access to Configuration pages
- Unable to save Investigations or modify exiting Investigations
-
Response Managers – This role allows users or groups to run, save, and modify Investigations and view the Configuration interface
-
Report Administrator – This role can configure/use anything on the investigations page
- No access to Configuration pages
- Only has access to the investigation pages
- Can create, edit, and assign any investigation
- Can export any investigation
- Can create or modify any subscription
For Netwrix Threat Manager Reporting Module, the Responders and Reviewers roles provide the same capabilities. The Responders role has additional permissions in a full Threat Manager deployment.
Authentication Types Defined
You can assign the following authentication types to users and groups:
- Built-in MFA – This type uses an Active Directory username and password with a one-time password (OTP) that the user configures on first login via a multi-factor authentication (MFA) solution (Authenticator, DUO, etc.)
- No MFA – This type uses only an Active Directory username and password for authentication
- Authentication Provider Profiles – This type enables third-party authentication providers using RADIUS, OpenID, and SAML integrations. Methods of authentication vary based on the third-party authentication provider. You must configure this on the Authentication Provider page of the Integrations interface to make it available for user assignment.
See the Authentication Provider Page topic for additional information.
Add Console Access
Verify that an Active Directory Sync has completed to ensure that the user and group information is current. See the Active Directory Sync Page for additional information.
To add console access for a user or group:
Step 1 – Use the gear icon in the upper right corner of the console to open the Configuration menu. Then select System Settings to open the System Settings interface.
Step 2 – On the User Access page of the System Settings interface, click New Access. The Add Console Access window opens.

Step 3 – Begin typing a user or group name in the User Access box. The dropdown menu populates with available options as you type. Select a user or group from the menu.
Step 4 – Select an authentication type from the Authentication Type dropdown menu.
Authentication provider profile types display after you configure an integration on the Authentication Provider page of the Integrations interface.
Step 5 – Select a role to assign it to the user or group from the Role dropdown menu.
Step 6 – Click Add. The Add Console Access window closes.
The application adds the user or group to the table with the assigned role.
Edit Console Access
To change the role assigned to a user or group:
Step 1 – Use the gear icon in the upper right corner of the console to open the Configuration menu. Then select System Settings to open the System Settings interface.
Step 2 – On the User Access page of the System Settings interface, click the Edit icon for a user or group.
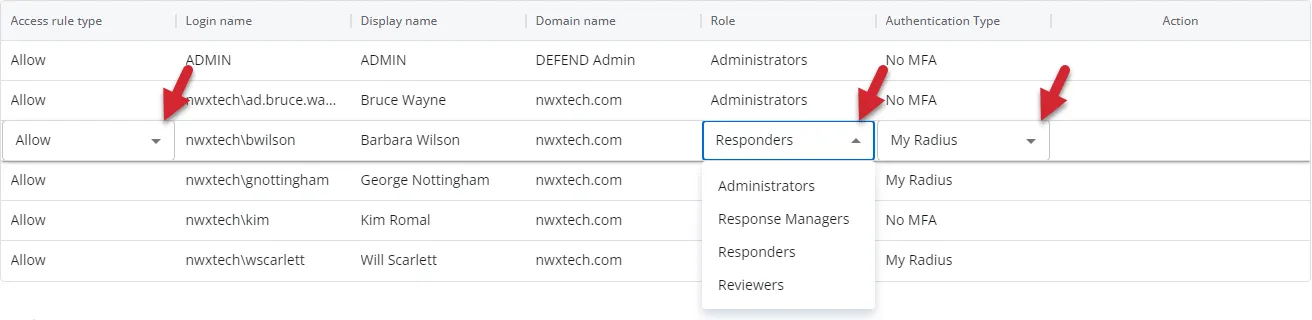
Step 3 – Use the dropdown menus to modify the Access rule type, Role, and/or Authentication Type for this user or group.
Step 4 – Click the Save icon, which replaced the Edit icon.
The application commits the modification for the selected user or group.
Edit Built-in Admin Password
To change the password for the built-in ADMIN account:
Step 1 – Use the gear icon in the upper right corner of the console to open the Configuration menu. Then select System Settings to open the System Settings interface.
Step 2 – On the User Access page of the System Settings interface, click the gear icon for the built-in ADMIN account. The Edit password for built-in admin window opens.

Step 3 – Enter the existing password in the Old Password field.
Step 4 – Enter the new password in the New Password field.
Step 5 – Re-enter the new password in the Confirm New Password field.
Step 6 – Click Save. The Edit password for built-in admin window closes.
You have now updated the password for the built-in ADMIN account.
Settings
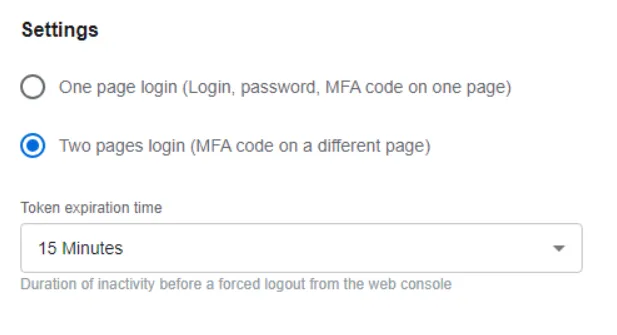
The Settings section lets you customize the user login page and configure the token expiration time for authenticated users.
-
One page login (Login, password, MFA code on one page) – Combines username and password, and multi-factor authentication on a single page
-
Two pages login (MFA code on a different page) – This is the default setting for the login page
- The first page requires a username and password
- The second page is the multi-factor authentication page
-
Token expiration time – The period of inactivity before the user must re-authenticate for access to the console. Select the expiration time you want from the dropdown menu:
- 15 Minutes
- 30 Minutes
- 1 Hour
- 4 Hours
Changing any of these options automatically saves your settings and applies to all users.